
In this post, I will step through getting Linux installed on a Raspberry Pi with an overview of different installations, and detailed setup on a headless installation. I will then move into connecting the Raspberry Pi to a LilyGo T-Beam device with Meshtastic Firmware, with the connection to the Raspberry Pi using a Serial Connection. Connecting one or more sensors to the Raspberry Pi, and finally sending that data to another Raspberry Pi connected to a LilyGo T-Beam.
Before Installing Linux on Raspberry Pi
There are several options for installing Linux on the Raspberry Pi. The first question to answer is, which distribution to use? There are several different distributions available for the Raspberry Pi boards. A comprehensive list of distributions available may be found at https://elinux.org/RPi_Distributions. The distribution that I will be using is Raspberry Pi OS by Raspberry Pi.
The next question to answer is do we want a desktop or do we wish to run in headless mode? Installing a desktop is helpful if we wish to use the Raspberry Pi as a regular computer with a nice user interface. Installing a desktop does require more resources but makes the Raspberry Pi more useful if we wish to connect it to a display and keyboard or use VNC from another machine.
A headless mode installation is best if we only need to work from the terminal (command line) and/or we want more resources for running applications to monitor sensors or server up web pages or application program interfaces (API).
The last question to ask is what peripherals and options do we need to have configured? We know we will want the serial interface enabled, since that will be used to communicate to the LilyGo T-Beam devices. Depending on the sensors that we wish to use, we may want to enable the I2C interface.
Another option we will want is to be able to control the Raspberry Pi from another machine as we do not want to connect a monitor, keyboard, and mouse. We will need to enable SSH and VNC to allow control from another machine.
Below is a list of our installation options that we will configure.
- Distribution: Raspberry Pi OS
- Mode: Desktop
- Enable SSH
- Enable VNC
- Enable Serial
- Enable I2C
We have a couple of ways to enable the above configuration but we will configure all of these options from the Raspberry Pi Imager as it makes this relatively easy and quick. The toughest part is determining what the IP Address is of the Raspberry Pi when it boots up.
Required software on the Windows, Linux, or Apple PC
There is some software that we need to have on the PC in order to install the Raspberry Pi OS and control it from the PC.
If the listed software does not support your operating system, look for a similar application for your operating system.
- Raspberry Pi OS Imager: https://www.raspberrypi.com/software/
- PuTTY – SSH Terminal Software: https://www.putty.org/
(Appears to only have Windows and Linux distributions) - WinSCP – SFTP Client: https://winscp.net/
(Appears to only have Windows distributions) - VNC Viewer – https://www.realvnc.com/en/connect/download/viewer/
Prepare SD Card for Raspberry Pi
- Insert an SD Card in your PC and note the drive letter. Make certain that the SD Card does not have anything that you wish to keep as the card will be wiped, so your information will be gone.

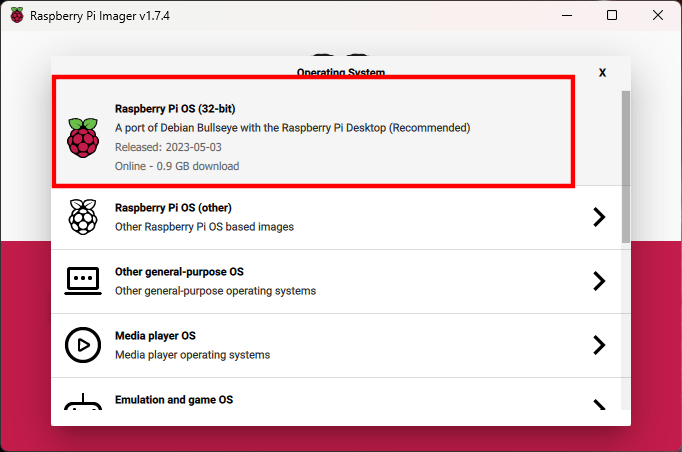
- Open the Raspberry Pi OS Imager and click the “Choose OS” button
In Windows, you will be prompted by the User Account Control (UAC) to continue. Select “Yes”

- Select “Raspberry Pi OS (32-bit)
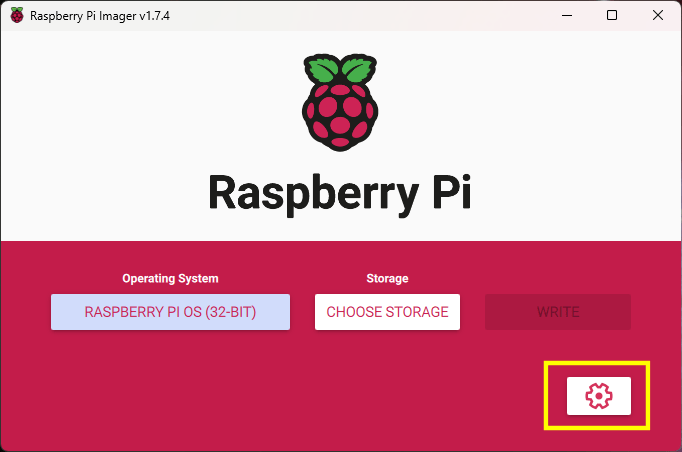
- Click the button in the lower right corner, with the gear icon for the advanced settings
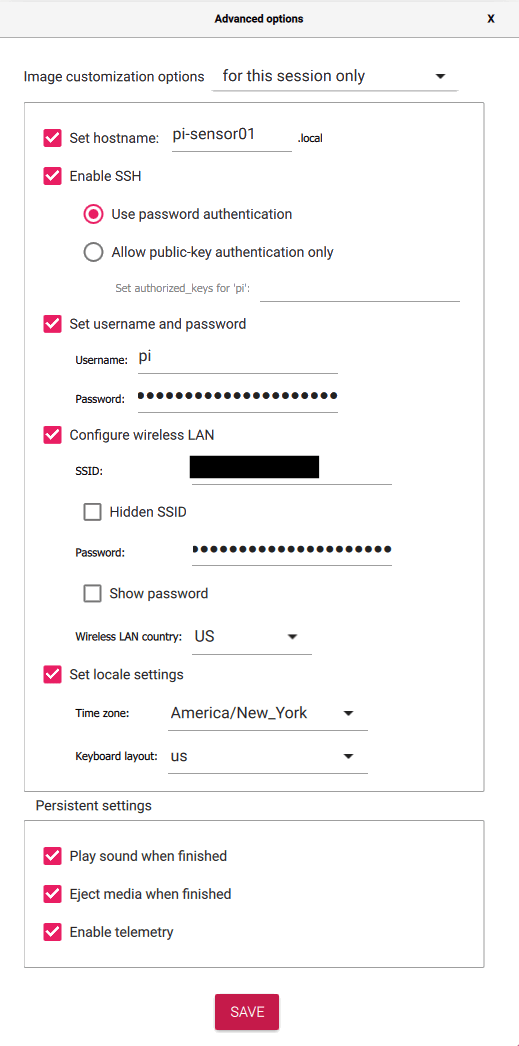
- Set the hostname (optional but recommended)
- Make certain that “Enable SSH” is checked and “Use password authentication” is selected
- Change the password and optionally change the username
- Enter the settings for your WiFi connection if not using ethernet
- Optionally set time zone and keyboard layout
- Once the options have been set, click the “Save” button
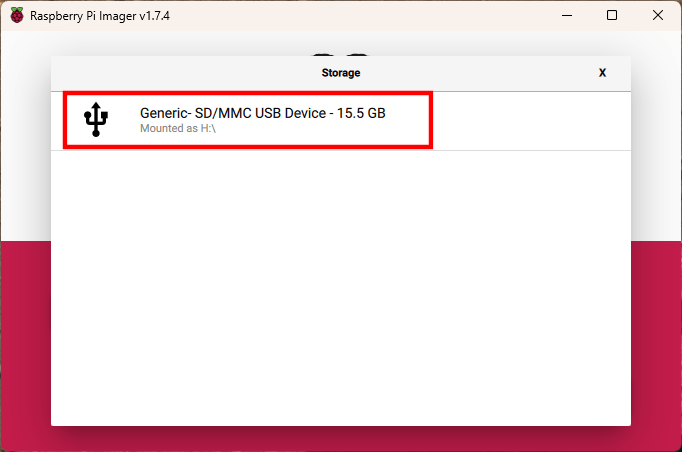
- Click the “Choose Storage” button
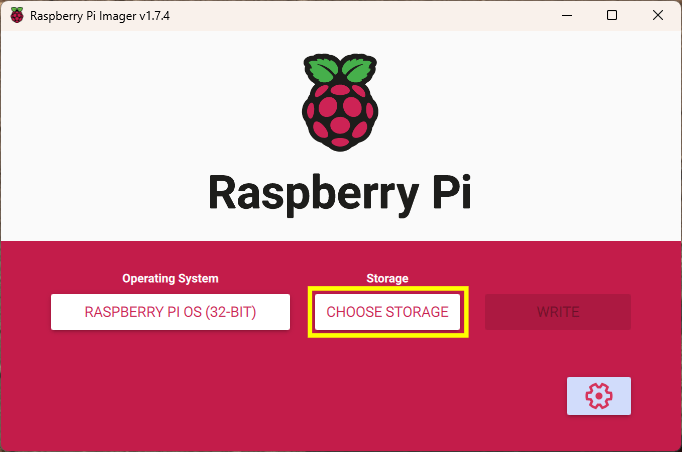
- Select the SD Card identified earlier. Make certain that this is the SD Card as all data will be wiped from the selected drive and will not be able to be recovered.
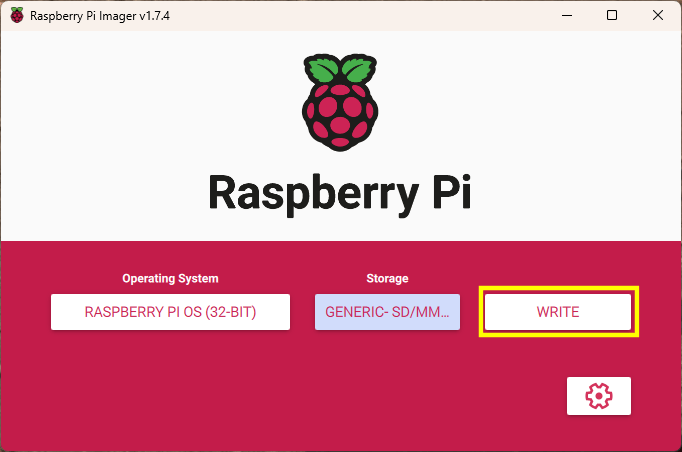
- Click the “Write” button to write the OS image to the SD Card
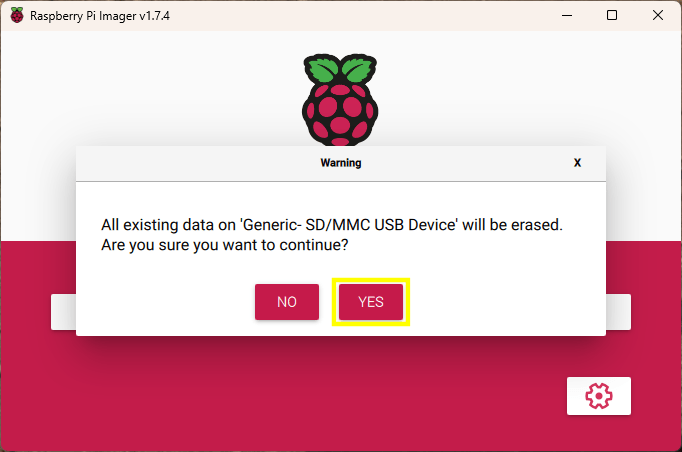
- If you are absolutely certain that the correct SD Card has been selected and there is no data on the card that you wish to keep, click the “Yes” button.
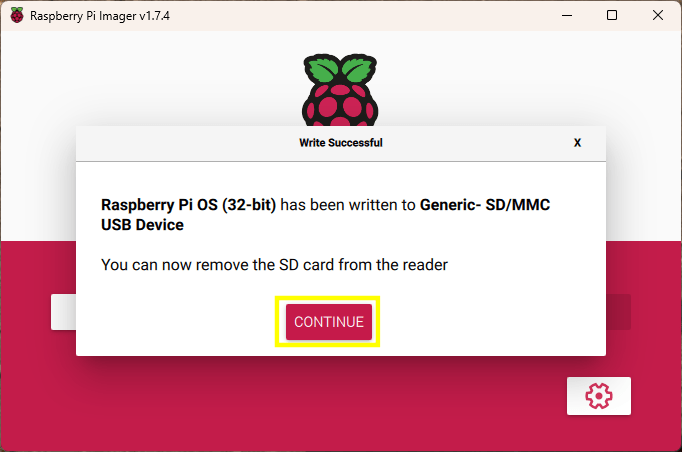
- Once the image has been written to the SD Card, you may click the “Continue” button, close the Raspberry Pi OS Imager, and remove the SD Card from the PC, and insert it into the Raspberry Pi.
- Once the SD Card is inserted into the Raspberry Pi, connect power to the Raspberry Pi
- After a couple of minutes, open PuTTY on your PC and attempt to connect to the Raspberry Pi using the name provided in the advanced options of the Raspberry Pi OS Imager. In the example, “pi-sensor01.local” was used. In PuTTY, attempt to connect using the hostname provided in the image configuration.
NOTE: If configuring another Raspberry Pi, do not use the same hostname.

- Click the “Open” button after entering the hostname
- You may see a PuTTY Security Alert if it is the first time connecting to the Raspberry Pi. If so, click the “Accept” button.

- Once connected, enter the username and password that was entered in the advanced settings fo the the Raspberry Pi OS Imager.

- Open the Raspberry Pi Configuration Tool by entering the following command:
sudo raspi-config - Select option 3, Interface Options, and press the Enter key

- Select option I3, VNC, and press the Enter key

- Select Yes, to enable VNC Server, and press the Enter key

- Select OK, and press the Enter key

- Repeat the steps above to enable the Serial Port and any other interfaces, such as SPI and I2C that may be needed.
- Check if there are any other options that you may want to set or execute. Some useful options are Advanced Options > Expand Filesystem and Update.
- When done making changes, select Finish to exit the configuration tool.
- If you selected Expand Filesystem, you may want to restart the Raspberry Pi by issuing the following command:
sudo reboot now
VNC Viewer
Check that we are able to connect the Raspberry Pi Desktop using VNC Viewer.
- Open VNC Viewer and connect to the hostname for the Raspberry Pi

- If this is the first time you are connecting the Raspberry Pi, you will see an Identity Check dialog. Click the “Continue” button.

- Enter the Raspberry Pi username and password, then click the “OK” button.

- If everything went correctly, you will be presented with the Raspberry Pi desktop.
