Categories
Android Arduino Meshtastic Microcontroller Raspberry Pi Pico Uncategorized

Meshtastic Serial

I wanted to see about connecting a Raspberry Pi Pico to a LillyGo TTGO T-Beam v1.1 device. I noticed that Meshtastic supports serial communications, so I decided to give it a go to see how it worked.

There are several serial modes but the ones that seem the most useful are TXTMSG and PROTO. First attempt will be with the TXTMSG Mode as that seems straight forward. Once the TXTMSG Mode is working, I will look into how to use the PROTO Mode.

Wiring

We need to connect the grounds between the two devices, then connect the transmit (TX) from one to the receive (RX) of the other device. Below is a table showing the connections used in my setup.

T-BeamPico
RX pin 13TX pin 1 (GP0)
TX pin 14RX pin 2 (GP1)
GNDGND
T-Beam and Pico wiring
Wiring between T-Beam and Raspberry Pi Pico

Meshtastic Setup

Meshtastic firmware was installed using the Web Installer at https://flasher.meshtastic.org/. The T-Beam came with Meshtastic preinstalled. You may need to use another method to install the firmware if the Web Installer does not work.

Meshtastic Web Installer

T-Beam TEXTMSG Mode

Once Meshtastic has been installed on the T-Beam device and connected to the Android or Apple application, go to the Module Settings to setup the serial connection on the T-Beam device. The Module Settings is accessed by clicking on the kebab menu (aka three vertical dots menu) and selecting “Module Settings”.

kebab menu
Kebab Menu
Module Settings menu item

Once the Module settings are displayed, scroll down to the “Serial Config” section and set the following items.

  • Serial enabled: turn on
  • RX: Set it to the T-Beam pin number for receive, which is 13 in my setup.
  • TX: Set it to the T-Beam pin number for transmit, which is 14 in my setup.
  • Serial baud rate: May leave it at the default setting or set it to “BAUD_38400”. I think it is best to set it as the default baud rate may change in other versions. I believe I read that it did change in the past.
  • Serial mode: Set it to TEXTMSG
  • Once everything is set, click the “Send” button.
Serial Configuration

Pico Arduino Code

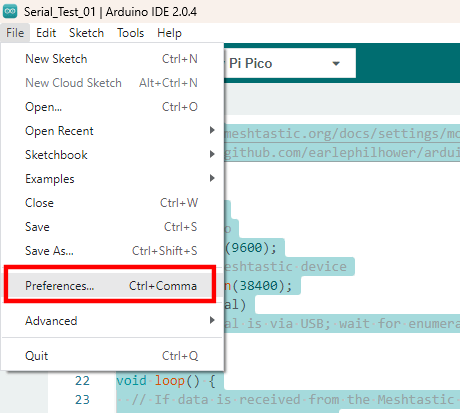
The Pico code is written in C++ using the Arduino IDE. It is necessary to configure use the Pico Board provided by Earle F. Philhower, III. First, add the URL, https://github.com/earlephilhower/arduino-pico/releases/download/global/package_rp2040_index.json, to the Additional Boards Manager URLs by going to File > Preferences in the menu.

Arduino Preferences Menu Item
Arduino IDE Preferences

Click the icon to the left of the “Additional boards manager URLs” entry. Add the URL to the a new line in the textbox and click the “OK” button.

Additional Boards Manager URLs

Open the boards manager by clicking on the boards manager icon, type “Pico” in the search textbox, and install the board, Raspberry Pi Pico/RP2040 by Earle F. Philhower, III.

Boards Manager
Boards Manager

Once the board is installed, you may select it from the boards dropdown selection in the IDE, when the Pico is connected to the PC.

Pico selected in the boards drop-down list
Raspberry Pi Pico selected in the boards drop-down list
/*
  Sample code to allow the Pico to act as a serial bridge between the PC and the Meshtastic device.

  Data sent to the Pico using the Arduino Serial Monitor, PuTTY, or other terminal software is sent
  to the Meshtastic device over the Pico UART0/Serial1 connection. Any data received from the Meshtastic
  device to the Pico is relayed to the PC over the Pico's serial over USB connection.

  REFERENCES:
    - https://meshtastic.org/docs/settings/moduleconfig/serial
    - https://github.com/earlephilhower/arduino-pico/discussions/210
*/

void setup() {
  // PC to Pico
  Serial.begin(9600);
  // Pico to Meshtastic device
  Serial1.begin(38400);
  while (!Serial)
    ;  // Serial is via USB; wait for enumeration
}

void loop() {
  // If data is received from the Meshtastic device, send it to the PC over the USB connection
  if (Serial1.available()) {
    String receiveMessage = Serial1.readString();
    Serial.print("Message received on Serial1 is:  ");
    Serial.println(receiveMessage);  // Send to serial monitor
  }

  // If data is received from the PC, send it to the Meshtastic Device
  while (Serial.available()) {
    int inByte = Serial.read();
    Serial1.write(inByte);
  }
}

Upload the code to the Raspberry Pi Pico. Once the code is loaded, open the serial monitor and type some text and hit enter. The message will be received on the other node(s).

Sending message from PC
Message received on other node

Sending a message from another node, will be received and shown in the serial terminal.

Sending message from another node
Receiving message on PC

Now the simple TEXTMSG is working, we can try to get the PROTO working. The PROTO mode is interesting as it may be possible to configure the Meshtastic device, and query it for additional information. I will look into the PROTO Mode in the near future.

Categories
Android Microcontroller

ATtiny85

I’m once again revisiting the ATtiny85 and wanted to see how to load sketches through USB in addition to the ICSP connection. I ran into quite a few stumbling blocks so I want to capture what I found in hopes that it will help others.


Categories
Android Product Review

Learning Android Development using Big Nerd Ranch’s book

I have been contemplating learning Android development for a while now. I have dabbled in it in the past but never took a deep dive to create an application from scratch. I decided to go through a book from start to finish to see if that will give me what I need to finally take the dive.

Android Programming Book by Big Nerd Ranch

Link to the book on Amazon

The book is laid out really well and explains things much clearer than other books I have looked at over the years. I will say that Java development is still not much better than it was 20 years ago, at least on a Windows OS. I know some people will like to bash me for that comment but let me tell you about day one of working through the book and why Java still has a long way to go. (In retrospect after writing this, the blame is not really Java but the IDE. About 20 years ago, both were an issue but at least my issue is more to do with the IDE rather than Java.)

Installation of Android Studio seemed to go well. I got through the GeoQuiz example with no problems other than needing to use a physical device rather than the emulator due to Hyper-V being enabled on my system. I then worked on the challenge by copying the completed example and opening the copy. I made my changes and attempted to launch the application. I received an error that the apk could not be loaded or copied and a prompt was given to uninstall the apk with a warning that user data may be deleted. Since the application did not have associated user data, I clicked the button to uninstall the apk. Another error showed up in the log stating that the apk could not be copied or installation failed. (Sorry, I do not call the exact text.)

At this point, I assumed that the issue was with my device having the application installed from the sample so I decided to try the emulator. I was being a bit lazy so I clicked the link in the emulator selection to turn off Hyper-V. This change required a reboot so I let the PC reboot. On reboot, Windows 10 attempted to fix an error and stated that automatic repair failed to fix the issue. I attempted to turn Hyper-V back on from the command prompt but I was unable to do so from the Windows PE command prompt. I then decided to try turning off early anti-virus and the PC rebooted. Of course I was not happy about that especially since my AV software kept complaining that it could not reach the live-update site and other issues. Basically I had a mess to clean up. Once I finally got the OS squared away, I decided to go back to the challenge. Now Android Studio was having all kinds of issues. (All of these issues may be related to other attempts to boot back into Windows including restoring a previous restore point.)

I uninstalled Android Studio, deleted the files in the Program Files folder, rebooted, and reinstalled Android Studio. I was still having issues launching Android Studio. I finally found that I needed to delete the contents of the C:\Users\AppData\Local\Android\Sdk folder. I then needed to reinstall the SDK, emulator, and build tools. Once these were reinstalled, Android Studio behaved well as it did before. I attempted to run the application and the emulator launched so that was great news but I received the original error regarding the apk file.

I was at a loss but looked a bit more into the log file and it pointed me to a file in the C:\Users\Documents\AndroidStudioProjects\GeoQuiz – Challenge\app\build\intermediates\split-apk\debug\slices folder. I deleted all of the files in the folder but I still received the same message. This was getting quite frustrating so I decided to try deleting all of the files and folders in the C:\Users\Documents\AndroidStudioProjects\GeoQuiz – Challenge\app\build folder. I attempted to build and run the application again. Low and behold, this time the application launched in the emulator. Finally success.

With all of this said, I’m going to keep marching on. It is very frustrating to have the Android Studio behave this way but hopefully my rant here will help someone. If nothing else, it will serve as a reminder to myself what to do when this error occurs.

Here are some locations of note regarding where Android Studio places files. If you want to uninstall and reinstall Android Studio, you should uninstall, delete the following folders, and reinstall. (These may not be all of the locations but these are the ones I found.)

  • C:\Program Files\Android
  • C:\Program Files (x86)\Android
  • C:\Users\.android
  • C:\Users\.AndroidStudio3.1
  • C:\Users\.gradle
  • C:\Users\AppData\Local\Android