
This week, I have some updates revolving around the Soft Latching Power Switch, that I last wrote about eight years ago. I finally returned to the project and now have it working as I intended. I also have made some changes to the Dual Volt Amp Meter‘s Desktop software. I believe I may now have a stable usable version. Lastly, I’ve gotten started with Flux.ai and plan on using it to replace my old version of Eagle.
Soft Latching Power Switch

I resolved a few items that I encountered previously when I attempted to use the Soft Latching Power Switch designed by Mosaic Industries to control an Adafruit 1000C. I was able to reliably control the PowerBoost 1000C using the Soft Latching circuit, one I removed R13 from the PowerBoost and placed a 200K ohm resistor between the enable and ground. R13 pulls up the enable pin to Vs so that the PowerBoost is always on, unless the enable pin is connected to ground. In my case, I wanted the opposite behavior. I wanted the PowerBoost to always be off unless the enable pin is connected to Vs.
The Soft Latching Power Switch designed by Mosaic Industries is intended to switch the 5V going into the Raspberry Pi but I wanted to use it differently by having it control turn off, or disable, the PowerBoost 1000C boost circuit. Below is a diagram showing the circuit used in this design.

The Soft Latching Power Switch is connected so that the input voltage is the Vs output of the Adafruit 1000C. The Vs output is USB voltage if USB Power is applied. If USB Power is not applied, Vs is the battery voltage. The output of the Soft Latching Power Switch output is connected to the enable pin of the Adafruit 1000C. The final connection of the Soft Latching Power Switch is the control pin, which is connected to GPIO22 (pin 15) of the Raspberry Pi.
The Adfruit PowerBoost 1000C is modified by removing the 200K ohm pull-up resistor, R13. An external 200K ohm resistor is connected between the enable pin and ground. A capacitor, around 0.01uF is placed in parallel with the resistor to prevent the PowerBoost from turning on the first time power is applied from either USB or battery. The value of the capacitor used is not critical. The first capacitor I grabbed was 0.01uF and it worked. The purpose of the capacitor is to make it look like a short from the enable pin to ground when power is first applied. If you find that it still starts from the on state rather than off state, you may need to use a higher value capacitor to provide more time for the capacitor to charge up and appear as a short to ground.
Once the circuit is put together and connected, you will need to load some scripts on the Raspberry Pi to allow the switch to shutdown the Raspberry Pi when the switch is pressed and for the Raspberry Pi to turn off the power when it shuts down. The scripts are available in the Pi-Power-Button project on GitHub.
This setup provides the following functionality:
- Button press to turn on
- Button press to signal to the device to shutdown
- Long button press to force power off
- Turn off power when the Raspberry Pi shuts down
Next Steps
- Clean up the code now that it is working as expected
- Possibly have one script file to handle shutdown and listening for button press
- Design another circuit to allow similar functionality from a keyboard similar to the functionality on the HP 95lx and Psion 5 PDAs
Dual Volt Amp Meter
Made some changes on the desktop application for the Dual Volt Amp Meter project that I wrote about a few weeks ago.
I was having some issues with the software after it was running for a few hours. I would get random errors related to an index being out of bounds and could not figure out how that was possible when I am in a for loop that has the lower bound being zero and the upper bound being one less than the count of items in the list. I neglected to connect the dots that I was manipulating the list in another thread to limit the number of items in the list. The error would crop up if the timing was just right that the check on the array bounds occurred on the main thread, then the code then removed the item on the other thread. The next line in my main thread then referenced the item that was just removed, then the application would crash.
I believe I have now resolved all of those issues, so the code should be stable now. It has been running for a couple of hours so far without any issues.
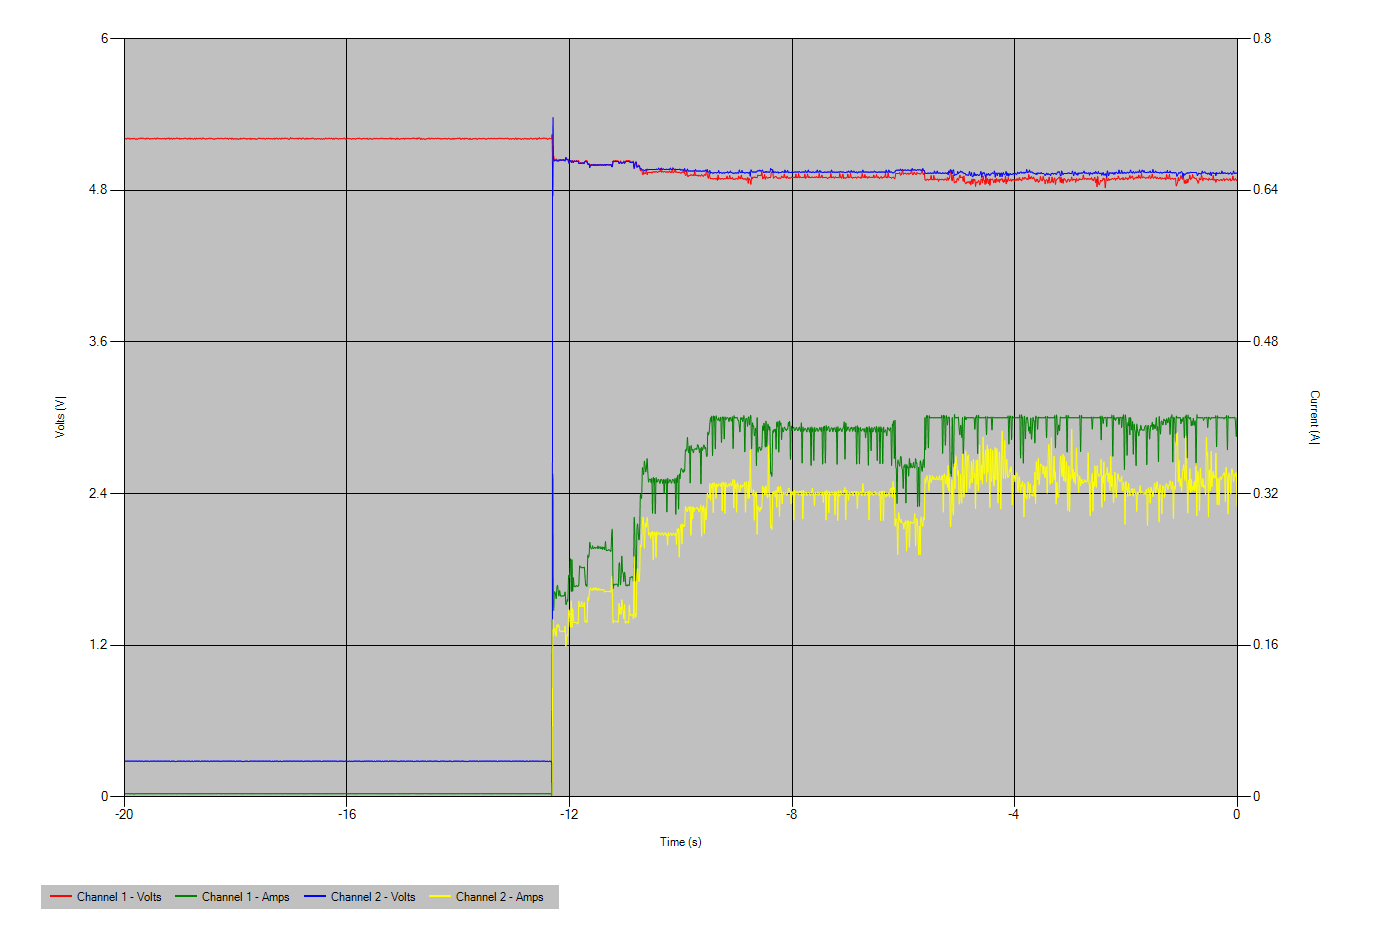
Below is a capture from the application showing the button on the Soft Latching Power Switch being pressed and turning on the PowerBoost 1000C and in turn, the Raspberry Pi.
Flux.ai
I discovered Flux.ai by watching a hackster.io video, where Alex Glow interviewed the Flux.ai team. I have since started working with Flux.ai and intend to create the Soft Latching Power Switch publicly in Flux.ai so others may use in their designs.
I really like what the Flux.ai has put together but it feels like there is much work to do to make it a product that may be used by the community. I plan to work more with Flux.ai and provide feedback to the team on design changes that may help users come up to speed quickly.
The only Schematic and PCB Layout tool that I have used successfully was Eagle. Once Eagle was acquired by Autodesk and moved to online subscription based licensing, I stopped updating Eagle. I’m still using Eagle 7.7.0 and would like to move on to something else. I have looked at KiCad and have it installed but have not made the commitment to start using it. Part of the reason is I have several components that I built in Eagle. I would need to start over in KiCad.
Another reason I have not moved to KiCad but am willing to move to Flux.ai, has to do with the parts libraries when sharing a project. I have received or pulled KiCad designs and have had to reach out to the authors to get some missing libraries. (The same is an issue with sharing Eagle designs.) Flux.ai solves this problem as libraries are online and may be shared with the community.
In addition to public parts, Flux.ai has the ability to create pull completed circuits with PCB layouts in other designs. This is great as one may design a power supply or other circuit and pull it in and reuse it in multiple projects. I have attempted something similar in Eagle but there are always issues with it and it seems you are always reinventing the wheel. Flux.ai eliminates redundant work and speeds up the design process.
Another advantage of Flux.ai is they have brought change management into the tool. You may see all the revisions made to a part or circuit, stay on an older version, or update to the latest change. This allows someone to update their public design to fix an issue and someone else who has used the design, may pull the latest fix into their design. It also allows someone to fork someone else’s design, improve upon it, then submit a pull request so the original designer can pull the change and everyone may benefit.
As you can tell, I’m very hopeful that Flux.ai will succeed and the Open Source community will embrace what Flux.ai is attempting to do with their hardware design platform. Give it a try. I hope to see the community help Flux.ai grow.
You may see what I’m up to on the platform by going to https://www.flux.ai/richteel. So far, I’ve put together one part for the IRF7319. I did so by forking another user’s part for the IRF7317.