

The camera has been more stable but needed restarting quite often then finally failed to restart. Using AI, the following steps were generated in an attempt to improve the stability/availability of the Raspberry Pi Camera over time.
This project uses a Raspberry Pi Zero 2 W and a Raspberry Pi Camera Module 3 to build a Wi-Fi camera that works with Frigate, Blue Iris, or any other Network Video Recorder (NVR) that can read an RTSP stream.
Updated September 2026 for Raspberry Pi OS “Trixie” and MediaMTX v1.21.1. This version also adds the pieces that keep the camera running for months unattended: automatic restarts, a hardware watchdog, a Wi-Fi watchdog, fewer writes to the SD card, and a daily health-report email.
Parts Used in this Project
Here are some links to the items that I used in this project.
The Amazon links are affiliate links that will provide me some income to offset the cost of this site and allow me to continue posting similar content. I have also provided links to PiShop.us in case items are out of stock at Amazon.
- Raspberry Pi Zero 2 W
- Amazon: https://amzn.to/3Bo6dSi
- PiShop.us: https://www.pishop.us/product/raspberry-pi-zero-2-w/
- Raspberry Pi Camera Module 3
- Raspberry Pi Zero Mini Camera Cable – 38mm
- Raspberry Pi Power Supply
- USB-A to Micro USB Cable – 10 Foot
- Amazon: https://amzn.to/4fAeGzQ
- Warning: a long, thin USB cable is the most common cause of an unreliable Pi camera. The voltage drops along the cable and the Pi freezes or corrupts its SD card. Use the shortest cable you can, or a thick (20–22 AWG) one, and check the power with Part 3 of this guide.
- PNY 32GB Elite Class 10 U1 microSDHC Flash Memory Card
- Amazon: https://amzn.to/4fHbp1n
- Better choice for a camera that runs 24/7: a “high endurance” card, such as SanDisk High Endurance or Samsung PRO Endurance. They are built for dash cams and security cameras and last much longer.
- Suction Cups 40mm Glass Suction (for window mounting)
- Amazon: https://amzn.to/3ZXBPYq
What this guide sets up
| Problem | What protects against it | Part |
|---|---|---|
| Not enough power (long cable, weak supply) | A check now, and a check in the daily email | 3, 12 |
| Wi-Fi going to sleep and dropping off the network | Wi-Fi power saving turned off | 4 |
| SD card wearing out | Fewer writes to the card | 5 |
| MediaMTX crashing | systemd restarts it automatically | 8 |
| The whole Pi freezing | Hardware watchdog reboots it | 9 |
| Wi-Fi disconnecting and not coming back | Wi-Fi watchdog reconnects, then reboots if needed | 10 |
| Problems nobody notices for weeks | Daily health-report email with fix instructions | 11, 12 |
Before you start
You will need:
- A DHCP reservation for the camera on your router, so its IP address never changes. Your NVR connects by IP address, so this matters. (You can add it after the Pi first connects, once you can see it in the router’s client list.)
- A Gmail account with 2-Step Verification turned on. You’ll create a Gmail app password in Part 11 so the Pi can send the daily email. Create a new app password just for this camera, so you can revoke it without affecting anything else.
- An SSH client (PuTTY on Windows) and VLC for testing the stream.
How to read this guide:
- Every command block starts with a comment line such as
# On picam03, as your user. That tells you where to run it. The#line is just a comment, so it’s harmless to paste it along with the command. - Run the commands in the order shown. Don’t skip ahead.
- After most steps there is an Expected result. If what you see is different, stop and sort it out before moving on.
- Anything written
REPLACE_...or<like-this>is a placeholder you must change to your own value. - This guide uses the hostname
picam03. Use your own camera’s name wherever you see it.
Part 1 – Write Raspberry Pi OS to the SD card
If you’ve already written the card: you’re fine to continue, as long as you picked Raspberry Pi OS Lite (64-bit) and set the hostname, username/password, Wi-Fi and SSH in the customization screens (step 1.4). If you skipped customization, it’s quickest to write the card again.
1.1. Open Raspberry Pi Imager and choose the device: “Raspberry Pi Zero 2 W”. 
1.2. Choose the operating system: “Raspberry Pi OS (other)”, then “Raspberry Pi OS Lite (64-bit)”. 

1.3. Choose the storage: your SD card. 
1.4. When Imager offers to customize the OS, say yes and set all of these. (The screenshots are from an older Imager version, and newer versions lay these screens out differently, but the settings are the same.)
- Hostname:
picam03 - Time zone and keyboard layout: yours. The time zone controls when the daily email arrives.
- Username and password: your choice. Don’t reuse a password from anywhere else.
- Wi-Fi: your network name (SSID), password, and Wi-Fi country (US). The Pi Zero 2 W only supports 2.4 GHz Wi-Fi.
- SSH: enabled.
1.5. Write the card. When Imager confirms it’s done and verified, move the card to the Pi and power it on. 
1.6. Give it 3–5 minutes. The first boot on a Pi Zero 2 W is slow, and it reboots itself once while it applies your settings.
Part 2 – First login and updates
2.1. Find the Pi’s IP address in your router’s client list (look for picam03) and add the DHCP reservation now. Then connect with PuTTY to that IP address, port 22, and log in with the username and password you set in Imager.
2.2. Confirm you’re on the right operating system:
# On picam03, as your user
grep VERSION_CODENAME /etc/os-release
uname -m
Expected result:
VERSION_CODENAME=trixie
aarch64
If it says bookworm, you have an older image. Update Raspberry Pi Imager and write the card again, because Part 5 of this guide is written for Trixie. If it says armv7l instead of aarch64, you picked the 32-bit OS. Write the card again with the 64-bit Lite version.
2.3. Install all updates. This can take 15–30 minutes on a Pi Zero 2 W.
# On picam03, as your user
sudo apt update
sudo apt full-upgrade -y
Expected result: it ends back at the prompt with no lines starting with E:. (W: warnings are okay.)
2.4. Install the tools the rest of this guide uses. Most are already installed, and listing them again does no harm.
# On picam03, as your user
sudo apt install -y curl iw rpicam-apps-lite
Expected result: it ends back at the prompt with no E: lines.
2.5. Reboot so the updates take effect, then log back in with PuTTY after a minute or two.
# On picam03, as your user
sudo reboot
Part 3 – Check the camera and the power
3.1. Make sure the Pi can see the camera:
# On picam03, as your user
rpicam-hello --list-cameras
Expected result: one camera listed. Camera Module 3 shows up as imx708, for example:
Available cameras
-----------------
0 : imx708 [4608x2592 10-bit RGGB] (/base/soc/i2c0mux/i2c@1/imx708@1a)
If it says No cameras available!, shut down (sudo poweroff), unplug the power, reseat both ends of the ribbon cable, and try again. The contacts must face the board, and the latches must be pushed fully closed.
3.2. Check the power. Power problems are the most common reason a Pi camera stops working, so don’t skip this. Run it with the camera mounted where it will live, on the real cable and power supply:
# On picam03, as your user
vcgencmd get_throttled
Expected result:
throttled=0x0
Any other value, such as throttled=0x50000 or throttled=0x50005, means the voltage has dropped too low since the Pi booted. Fix that before going any further: use a shorter or thicker cable, or a better power supply. Then reboot and check again. (Part 12’s daily email keeps checking this, because under-voltage often shows up only under load, once the camera is streaming.)
Part 4 – Make Wi-Fi reliable
4.1. Turn off Wi-Fi power saving. When it’s on, the Pi’s Wi-Fi dozes off and the camera disappears from the network. This setting file works however your Wi-Fi connection was created:
# On picam03, as your user
sudo tee /etc/NetworkManager/conf.d/wifi-powersave-off.conf >/dev/null <<'EOF'
[connection]
wifi.powersave = 2
EOF
Expected result: no output. (2 means “disabled” in NetworkManager’s settings.)
4.2. Reboot, log back in, and check it:
# On picam03, as your user
sudo reboot
# On picam03, as your user
iw dev wlan0 get power_save
Expected result:
Power save: off
4.3. Check the signal strength where the camera is mounted:
# On picam03, as your user
iw dev wlan0 link | grep -E "SSID|signal"
Expected result: something like signal: -58 dBm. Closer to 0 is stronger. Around -60 or better is good. Weaker than -70 (for example -75) is unreliable for video, so move the access point or the camera before continuing.
4.4. Check that your router answers a ping. The Wi-Fi watchdog in Part 10 uses this to decide whether the network is up.
# On picam03, as your user
ip route show default
ping -c 3 $(ip route show default | awk '{ print $3; exit }')
Expected result: the first line shows default via <router-ip> dev wlan0 ..., and the ping ends with 3 packets transmitted, 3 received, 0% packet loss. If the router does not answer pings (100% packet loss, even though you’re connected over SSH), make a note of it. You’ll need to point the watchdog at something else in step 10.3.
Part 5 – Reduce writes to the SD card
SD cards wear out from being written to. A camera that runs 24/7 doesn’t need to write much, so these steps cut out the writing it doesn’t need. Nothing here affects the video.
5.1. Keep swap in RAM only. Trixie uses compressed swap in RAM (called zram), but by default it also copies idle memory to a 2 GB file on the SD card every day. This drop-in file turns off the SD card part:
# On picam03, as your user
sudo mkdir -p /etc/rpi/swap.conf.d
sudo tee /etc/rpi/swap.conf.d/90-zram-only.conf >/dev/null <<'EOF'
[Main]
Mechanism=zram
EOF
Expected result: no output. The change takes effect at the reboot in step 5.6.
5.2. Cap the system log. The log stays on the SD card, so if the Pi ever crashes you can still read what happened before the crash. It’s limited to 50 MB, so it can’t grow forever:
# On picam03, as your user
sudo mkdir -p /etc/systemd/journald.conf.d
sudo tee /etc/systemd/journald.conf.d/10-picam.conf >/dev/null <<'EOF'
[Journal]
Storage=persistent
SystemMaxUse=50M
EOF
Expected result: no output.
5.3. Make sure logs aren’t written twice. Older systems ran a second logger (rsyslog) that copied every message into /var/log/syslog as well:
# On picam03, as your user
systemctl is-active rsyslog
Expected result: inactive, or an error that the unit could not be found. Either is fine. Only if it says active, turn it off:
# On picam03, as your user - ONLY if the previous command said "active"
sudo systemctl disable --now rsyslog
5.4. Stop automatic background package downloads. These timers download package lists and rebuild the manual-page index on a schedule. Turning them off saves writes, and it also means nothing changes on the camera unless you choose to update it (see Maintenance at the end). Run these one at a time. If one of them says it doesn’t exist, that’s fine; just go on to the next.
# On picam03, as your user
sudo systemctl disable --now apt-daily.timer
# On picam03, as your user
sudo systemctl disable --now apt-daily-upgrade.timer
# On picam03, as your user
sudo systemctl disable --now man-db.timer
Expected result: each prints a Removed "/etc/systemd/system/timers.target.wants/..." line, or nothing if it was already off.
5.5. Check two things Raspberry Pi OS should already do (nothing to change if they match):
# On picam03, as your user
findmnt -no OPTIONS /
findmnt -no FSTYPE /tmp
Expected result:
rw,noatime
tmpfs
noatime means Linux doesn’t write to the card every time a file is simply read. tmpfs means /tmp lives in RAM. If the first line doesn’t include noatime, stop and look into it before editing anything. A mistake in /etc/fstab can stop the Pi from booting.
5.6. Reboot to apply the swap and log changes, then log back in:
# On picam03, as your user
sudo reboot
5.7. Verify:
# On picam03, as your user
swapon --show
ls -l /var/swap
journalctl --disk-usage
Expected result:
swaponshows only/dev/zram0(no/var/swapfile).lssaysNo such file or directory(the 2 GB swap file has been removed).journalctlreports a few MB, and never more than 50 MB.
Optional, for later: Raspberry Pi OS can also make the whole SD card read-only (
sudo raspi-config→ Performance Options → Overlay File System). That protects the card completely, but every change you make, and every log, is lost at reboot, and you have to turn it off to install updates. Only consider it once everything has been running well for a while.
Part 6 – Install MediaMTX
6.1. Download MediaMTX v1.21.1 (the latest release as of September 2026), along with the official checksum file:
# On picam03, as your user
cd ~
wget https://github.com/bluenviron/mediamtx/releases/download/v1.21.1/mediamtx_v1.21.1_linux_arm64.tar.gz
wget https://github.com/bluenviron/mediamtx/releases/download/v1.21.1/checksums.sha256
Note: the file name changed in newer releases. It’s now linux_arm64, not linux_arm64v8 as in older guides.
6.2. Check that the download is complete and hasn’t been tampered with:
# On picam03, as your user
sha256sum --check --ignore-missing checksums.sha256
Expected result:
mediamtx_v1.21.1_linux_arm64.tar.gz: OK
If it says FAILED, delete the file and download it again. Do not continue with a file that fails.
6.3. Unpack it and install the program and its config file in the standard system locations:
# On picam03, as your user
mkdir -p ~/mediamtx
tar -xzf mediamtx_v1.21.1_linux_arm64.tar.gz -C ~/mediamtx
sudo install -m 755 ~/mediamtx/mediamtx /usr/local/bin/mediamtx
sudo mkdir -p /usr/local/etc
sudo install -m 644 ~/mediamtx/mediamtx.yml /usr/local/etc/mediamtx.yml
/usr/local/bin/mediamtx --version
Expected result: the last command prints v1.21.1.
6.4. Change the settings. This turns off everything except RTSP (the protocol your NVR uses), and turns on the local status API that the health email uses. The API only answers on the Pi itself (127.0.0.1), never on the network. Paste the whole block at once:
# On picam03, as your user
sudo sed -i \
  -e 's/^rtspTransports: \[udp, multicast, tcp\]$/rtspTransports: [tcp]/' \
  -e 's/^rtmp: true$/rtmp: false/' \
  -e 's/^hls: true$/hls: false/' \
  -e 's/^webrtc: true$/webrtc: false/' \
  -e 's/^srt: true$/srt: false/' \
  -e 's/^moq: true$/moq: false/' \
  -e 's/^api: false$/api: true/' \
  -e 's/^apiAddress: :9997$/apiAddress: 127.0.0.1:9997/' \
  /usr/local/etc/mediamtx.yml
grep -nE '^(api|apiAddress|rtspTransports|rtmp|hls|webrtc|srt|moq):' /usr/local/etc/mediamtx.yml
Expected result: exactly these 8 lines, with these values (the line numbers may be slightly different):
147:api: true
149:apiAddress: 127.0.0.1:9997
245:rtspTransports: [tcp]
290:rtmp: false
314:hls: false
377:webrtc: false
437:srt: false
445:moq: false
If any line still shows its old value, open the file with sudo nano /usr/local/etc/mediamtx.yml, find that line with Ctrl+W, and change it by hand.
Why each change: rtspTransports: [tcp] makes the stream use TCP only, which holds up much better over Wi-Fi than UDP. RTMP, HLS, WebRTC, SRT and MoQ are other streaming protocols this camera doesn’t use. Turning them off saves memory and CPU on the Pi Zero, and leaves fewer network ports open.
6.5. Replace the paths: section at the bottom of the file with the camera settings. The first command deletes everything from the paths: line to the end of the file. The second adds the new section.
# On picam03, as your user
sudo sed -i '/^paths:/,$d' /usr/local/etc/mediamtx.yml
sudo tee -a /usr/local/etc/mediamtx.yml >/dev/null <<'EOF'
paths:
  cam:
    source: rpiCamera
    rpiCameraWidth: 1280
    rpiCameraHeight: 720
    rpiCameraFPS: 15
    rpiCameraBitrate: 1500000
    rpiCameraIDRPeriod: 30
EOF
tail -n 8 /usr/local/etc/mediamtx.yml
Expected result: the last 8 lines of the file are exactly the paths: block above, and paths: appears only once in the file.
Why these settings:
- 720p at 15 frames per second and 1.5 Mbps is comfortable for a Pi Zero 2 W and for 2.4 GHz Wi-Fi.
rpiCameraIDRPeriod: 30sends a full “key frame” every 2 seconds. The default is every 4 seconds. With more frequent key frames, Frigate and Blue Iris connect faster and their recordings cut more cleanly.- The default
all_others:entry is left out on purpose. Without it,camis the only stream that exists on this camera, and nobody on the network can push a different stream into it.
6.6. Have MediaMTX check the config file for mistakes:
# On picam03, as your user
/usr/local/bin/mediamtx --validate-conf=/usr/local/etc/mediamtx.yml
Expected result:
configuration file: /usr/local/etc/mediamtx.yml
configuration file is valid
If it prints an ERR: line instead, it names the setting that’s wrong. Fix it with sudo nano /usr/local/etc/mediamtx.yml and run the check again.
6.7. Run MediaMTX by hand once to test it:
# On picam03, as your user
sudo /usr/local/bin/mediamtx /usr/local/etc/mediamtx.yml
Expected result: it keeps running and shows lines similar to these, with no ERR lines:
INF MediaMTX v1.21.1
INF configuration loaded from /usr/local/etc/mediamtx.yml
INF [RTSP] started with listeners on :8554 (TCP/RTSP)
INF [API] started with listener on 127.0.0.1:9997 (TCP/HTTP)
followed by some camera start-up lines. A WAR line mentioning sdn.cpp (legacy SDN tuning) is harmless. Leave it running for Part 7.
Part 7 – Test the stream in VLC
7.1. On your Windows PC, open VLC, click the “Media” menu, and choose “Open Network Stream…”. 
7.2. In the “Please enter a network URL:” box, enter the following (with the Pi’s IP address) and press “Play”: rtsp://<picam03-ip>:8554/cam 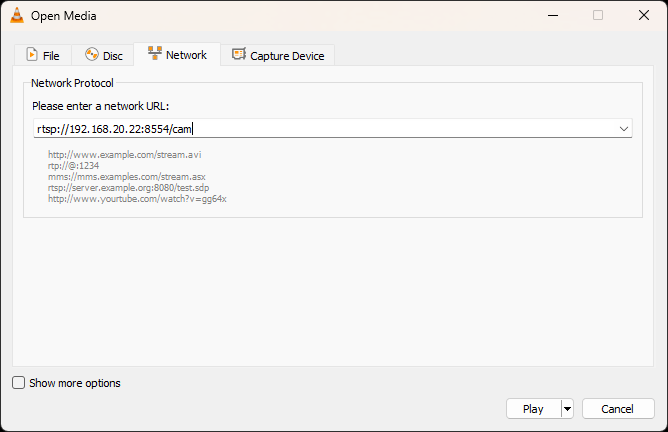
Expected result: video from the camera appears within a few seconds, and the PuTTY window shows a line like:
INF [RTSP] [session 861b8faa] is reading from path 'cam', with TCP, 1 track (H264)

If you see repeated write queue is full warnings, the Wi-Fi can’t keep up and frames are being dropped. Don’t ignore these. Improve the signal (step 4.3), or lower rpiCameraBitrate.
7.3. Close VLC. In PuTTY, stop MediaMTX with Ctrl+C. Only one program can use the camera at a time, so it has to be stopped before the service in Part 8 can start it.
Part 8 – Run MediaMTX as a service that restarts itself
8.1. Create the service file. Restart=always is the key line: if MediaMTX ever crashes, systemd starts it again 5 seconds later instead of leaving the camera dead.
# On picam03, as your user
sudo tee /etc/systemd/system/mediamtx.service >/dev/null <<'EOF'
[Unit]
Description=MediaMTX RTSP server for the Pi camera
Wants=network-online.target
After=network-online.target
StartLimitIntervalSec=0

[Service]
ExecStart=/usr/local/bin/mediamtx /usr/local/etc/mediamtx.yml
Restart=always
RestartSec=5

[Install]
WantedBy=multi-user.target
EOF
Expected result: no output.
8.2. Load it, start it, and make it start at every boot. These are separate commands, each on its own line:
# On picam03, as your user
sudo systemctl daemon-reload
sudo systemctl enable --now mediamtx
systemctl status mediamtx --no-pager
Expected result: the status shows Loaded: ... enabled and Active: active (running). Check VLC again. The stream should play.
8.3. Prove that the automatic restart works by force-killing MediaMTX:
# On picam03, as your user
sudo systemctl kill --signal=SIGKILL mediamtx
Wait 10 seconds, then:
# On picam03, as your user
systemctl status mediamtx --no-pager
journalctl -u mediamtx -n 20 --no-pager | grep "Scheduled restart"
Expected result: Active: active (running) with a start time from just a few seconds ago, and a line containing Scheduled restart job, restart counter is at 1. (Tomorrow’s health email will report “MediaMTX crashed and was restarted 1 time”. That’s this test, and it only appears once.)
Useful commands from now on:
systemctl status mediamtx --no-pager        # is it running?
sudo systemctl restart mediamtx             # restart it (e.g. after editing the .yml)
sudo journalctl -u mediamtx -n 50 --no-pager   # its last 50 log lines
sudo journalctl -u mediamtx -f              # watch its log live (Ctrl+C to stop)
Part 9 – Turn on the hardware watchdog
The Pi has a built-in hardware timer. Once it’s switched on, the Pi’s system manager (systemd) resets the timer every few seconds. If the Pi freezes completely, the timer runs out and the hardware reboots the Pi about 15 seconds later. Without this, a frozen camera stays frozen until someone pulls the plug.
9.1. Create the setting file:
# On picam03, as your user
sudo mkdir -p /etc/systemd/system.conf.d
sudo tee /etc/systemd/system.conf.d/watchdog.conf >/dev/null <<'EOF'
[Manager]
RuntimeWatchdogSec=15
EOF
Expected result: no output. (15 seconds is the longest the Pi’s watchdog supports. Don’t set it higher.)
9.2. Reboot, log back in, and check it:
# On picam03, as your user
sudo reboot
# On picam03, as your user
systemctl show -p RuntimeWatchdogUSec --value
Expected result:
15s
9.3. (Optional, but it proves the watchdog works.) This deliberately crashes the Linux kernel. With the watchdog on, the Pi should reboot by itself within about 30 seconds, and PuTTY will disconnect. Only do this once everything above is working. It’s an unclean crash, much like pulling the power.
# On picam03, as your user - OPTIONAL: deliberately crashes the Pi
echo c | sudo tee /proc/sysrq-trigger
Expected result: PuTTY stops responding. After 1–2 minutes, you can log in again and the stream plays in VLC.
Part 10 – Install the Wi-Fi watchdog
Sometimes a Pi Zero loses Wi-Fi and never reconnects, even though Linux itself is still running fine, so the hardware watchdog won’t step in. This script pings your router every minute:
- After 3 failed minutes in a row, it turns Wi-Fi off and back on.
- After 10 failed minutes in a row, it reboots the Pi.
- It never reboots within 30 minutes of booting, so a long router or access-point outage can’t cause a reboot loop.
- It keeps its failure count in memory, so the only thing it writes to the SD card is its log lines, and only when something goes wrong.
10.1. Create the script. Paste the whole block at once. It’s long, and it ends with the line SCRIPT_END:
# On picam03, as your user
sudo tee /usr/local/sbin/wifi-watchdog.sh >/dev/null <<'SCRIPT_END'
#!/bin/bash
# wifi-watchdog.sh - keeps a Wi-Fi-only Raspberry Pi reachable.
#
# Every CHECK_INTERVAL seconds it pings the default gateway (or TARGET).
#   - After FAILS_BEFORE_RECONNECT failed checks in a row it turns Wi-Fi off and on.
#   - After FAILS_BEFORE_REBOOT failed checks in a row it reboots the Pi,
#     but never sooner than MIN_UPTIME_FOR_REBOOT seconds after boot, so a long
#     router/access-point outage can't cause a fast reboot loop.
# The failure counter is kept in memory only, so this never writes to the SD card
# except for its log lines (tag: wifi-watchdog), which the daily health email reads.
#
# Every setting can be overridden from the environment, which is how the test in
# picam_setup.md runs it. DRY_RUN=1 logs what it would do instead of doing it.

TARGET="${TARGET:-}"                                    # empty = ping the default gateway
CHECK_INTERVAL="${CHECK_INTERVAL:-60}"                  # seconds between checks
FAILS_BEFORE_RECONNECT="${FAILS_BEFORE_RECONNECT:-3}"   # ~3 minutes offline
FAILS_BEFORE_REBOOT="${FAILS_BEFORE_REBOOT:-10}"        # ~10 minutes offline
MIN_UPTIME_FOR_REBOOT="${MIN_UPTIME_FOR_REBOOT:-1800}"  # 30 minutes
STARTUP_DELAY="${STARTUP_DELAY:-120}"                   # let Wi-Fi connect after boot
DRY_RUN="${DRY_RUN:-0}"

# Test runs log under a different name so the daily health email doesn't
# mistake them for real reconnects/reboots.
LOG_TAG="wifi-watchdog"
[ "$DRY_RUN" = "1" ] && LOG_TAG="wifi-watchdog-test"

log() {
    # -s also prints the message to the terminal when run by hand
    logger -s -t "$LOG_TAG" "$1"
}

target_to_ping() {
    if [ -n "$TARGET" ]; then
        echo "$TARGET"
    else
        ip route show default 2>/dev/null | awk '{ print $3; exit }'
    fi
}

log "started (check every ${CHECK_INTERVAL}s, reconnect after ${FAILS_BEFORE_RECONNECT}, reboot after ${FAILS_BEFORE_REBOOT} failed checks)"
sleep "$STARTUP_DELAY"

fails=0
while true; do
    target=$(target_to_ping)

    if [ -n "$target" ] && ping -c 3 -W 2 -q "$target" >/dev/null 2>&1; then
        if [ "$fails" -gt 0 ]; then
            log "network is back after $fails failed check(s)"
        fi
        fails=0
    else
        fails=$((fails + 1))
        log "check failed ($fails in a row), target: ${target:-no default route}"

        uptime_s=$(cut -d. -f1 /proc/uptime)
        if [ "$fails" -ge "$FAILS_BEFORE_REBOOT" ] && [ "$uptime_s" -ge "$MIN_UPTIME_FOR_REBOOT" ]; then
            log "REBOOTING: network unreachable for $fails checks"
            if [ "$DRY_RUN" = "1" ]; then
                log "DRY_RUN: would reboot now - stopping test"
                exit 0
            fi
            systemctl reboot
            exit 0
        elif [ $((fails % FAILS_BEFORE_RECONNECT)) -eq 0 ]; then
            log "RECONNECT: turning Wi-Fi off and on"
            if [ "$DRY_RUN" = "1" ]; then
                log "DRY_RUN: would run: nmcli radio wifi off; nmcli radio wifi on"
            else
                nmcli radio wifi off
                sleep 5
                nmcli radio wifi on
            fi
        fi
    fi

    sleep "$CHECK_INTERVAL"
done
SCRIPT_END
sudo chmod 755 /usr/local/sbin/wifi-watchdog.sh
sha256sum /usr/local/sbin/wifi-watchdog.sh
Expected result:
8661acc8ac396cd24f46ca8e453b55a7a32d0b99e0648fc94b723a69ce6017ae /usr/local/sbin/wifi-watchdog.sh
If the checksum is different, something was lost or changed while pasting. Run step 10.1 again.
10.2. Test it without letting it change anything (DRY_RUN=1). First, against your real router, where it should stay quiet:
# On picam03, as your user
DRY_RUN=1 STARTUP_DELAY=0 CHECK_INTERVAL=5 /usr/local/sbin/wifi-watchdog.sh
Expected result: one line wifi-watchdog-test: started (...), and then nothing more. Every ping is succeeding. Wait about 20 seconds, then press Ctrl+C. (If you see check failed lines instead, your router doesn’t answer pings. See step 10.3.)
Next, against an address that doesn’t exist (192.0.2.1 is reserved for testing), where it should go through the reconnect and reboot steps. It only prints what it would do:
# On picam03, as your user
DRY_RUN=1 STARTUP_DELAY=0 CHECK_INTERVAL=1 TARGET=192.0.2.1 FAILS_BEFORE_RECONNECT=2 FAILS_BEFORE_REBOOT=4 MIN_UPTIME_FOR_REBOOT=0 /usr/local/sbin/wifi-watchdog.sh
Expected result: after about 15 seconds it stops by itself, having printed:
wifi-watchdog-test: check failed (1 in a row), target: 192.0.2.1
wifi-watchdog-test: check failed (2 in a row), target: 192.0.2.1
wifi-watchdog-test: RECONNECT: turning Wi-Fi off and on
wifi-watchdog-test: DRY_RUN: would run: nmcli radio wifi off; nmcli radio wifi on
wifi-watchdog-test: check failed (3 in a row), target: 192.0.2.1
wifi-watchdog-test: check failed (4 in a row), target: 192.0.2.1
wifi-watchdog-test: REBOOTING: network unreachable for 4 checks
wifi-watchdog-test: DRY_RUN: would reboot now - stopping test
(Each line may start with a date and <13>. That’s normal. Test runs log as wifi-watchdog-test so the health email doesn’t count them as real events.)
10.3. Only if your router did not answer pings in step 4.4 or 10.2: pick another device on your network that is always on and does answer pings (for example your DNS server), and set it as the target:
# On picam03, as your user - ONLY if your router doesn't answer pings
sudo nano /usr/local/sbin/wifi-watchdog.sh
Change the line TARGET="${TARGET:-}" to TARGET="${TARGET:-<ip-of-that-device>}", save (Ctrl+O, Enter), exit (Ctrl+X), and repeat the first test in step 10.2. (The checksum in step 10.1 won’t match after this edit. That’s expected.)
10.4. Create the service that keeps the watchdog running:
# On picam03, as your user
sudo tee /etc/systemd/system/wifi-watchdog.service >/dev/null <<'EOF'
[Unit]
Description=Wi-Fi watchdog (reconnect, then reboot, if the network is lost)
Wants=network-online.target
After=network-online.target

[Service]
ExecStart=/usr/local/sbin/wifi-watchdog.sh
Restart=always
RestartSec=10

[Install]
WantedBy=multi-user.target
EOF
sudo systemctl daemon-reload
sudo systemctl enable --now wifi-watchdog
systemctl status wifi-watchdog --no-pager
Expected result: Active: active (running) and a log line wifi-watchdog: started (check every 60s, reconnect after 3, reboot after 10 failed checks).
To see what the watchdog has done at any time:
journalctl -t wifi-watchdog --since "7 days ago" --no-pager
Part 11 – Let the Pi send email (through Gmail)
11.1. Create a Gmail app password for this camera. Do this on your PC:
- Go to https://myaccount.google.com/apppasswords and sign in. (If Google says app passwords aren’t available, turn on 2-Step Verification first, under Security.)
- For the app name, type
picam03and click Create. - Google shows a 16-letter password in four groups, like
abcd efgh ijkl mnop. Copy it somewhere safe for the next few minutes. You’ll type it without the spaces:abcdefghijklmnop.
11.2. Install msmtp, a small program that sends email through Gmail:
# On picam03, as your user
sudo apt install -y msmtp
Expected result: it installs. If a blue screen asks “Enable AppArmor support?”, choose No (the default) and press Enter.
11.3. Create the mail settings file. It uses placeholders, so your password never ends up in your command history:
# On picam03, as your user
sudo tee /etc/msmtprc >/dev/null <<'EOF'
# /etc/msmtprc - lets this Pi send email through Gmail
defaults
auth           on
tls            on
tls_trust_file /etc/ssl/certs/ca-certificates.crt
syslog         LOG_MAIL

account        gmail
host           smtp.gmail.com
port           587
from           REPLACE_GMAIL_ADDRESS
user           REPLACE_GMAIL_ADDRESS
password       REPLACE_APP_PASSWORD

account default : gmail
EOF
sudo chmod 600 /etc/msmtprc
11.4. Put in your real values:
# On picam03, as your user
sudo nano /etc/msmtprc
Replace both REPLACE_GMAIL_ADDRESS with your Gmail address, and REPLACE_APP_PASSWORD with the 16-letter app password (no spaces). Save (Ctrl+O, Enter) and exit (Ctrl+X). Then check who can read the file:
# On picam03, as your user
ls -l /etc/msmtprc
Expected result: it starts with -rw------- 1 root root, which means only root can read the password.
11.5. Send a test email (replace the address with where you want camera emails to go):
# On picam03, as your user
printf 'Subject: picam03 test email\n\nIf you can read this, the Pi can send email.\n' | sudo msmtp REPLACE_EMAIL_TO
Expected result: no output, and the email arrives within a minute or so (check Spam the first time). If it fails, see what happened with sudo journalctl -t msmtp -n 5 --no-pager. An authentication failed error means the app password or Gmail address is wrong. A connection timed out error means something (such as a firewall rule on your network) is blocking outgoing port 587.
Part 12 – Daily health-report email
Once a day at 7:00 AM, this script checks the camera and emails you a report. The subject line tells you at a glance: [picam03] Daily health: OK or [picam03] Daily health: 2 PROBLEM(S) FOUND. Every problem in the email comes with step-by-step instructions to fix it.
What it checks:
| Check | Flagged when |
|---|---|
| Power supply | vcgencmd get_throttled is not 0x0. It tells a power problem apart from a heat problem, and gives fix suggestions for each. |
| Temperature | 75 °C or hotter |
| Wi-Fi power saving | It’s on (includes the instructions to turn it off) |
| Wi-Fi signal | Weaker than -70 dBm |
| Wi-Fi watchdog | It had to reconnect or reboot in the last 24 hours, or it isn’t running |
| MediaMTX | Not set to restart automatically (with fix instructions), not running, not starting at boot, or crashed in the last 24 hours |
| Camera | Not producing video, even though MediaMTX is running |
| Hardware watchdog | Turned off (with fix instructions) |
| Disk space | Any filesystem with less than 20% free |
| SD card health | The card has switched to read-only, filesystem errors are recorded, the kernel logged read/write errors, or much more is being written than normal |
About SD card health: ordinary SD cards don’t report how worn out they are the way SSDs do, so there’s no “percent life left” to read. Instead, the script watches for the warning signs that show up before a card fails: filesystem errors, read/write errors and timeouts in the kernel log, and the card switching itself to read-only. It also reports how much is written to the card each day, so you can see that Part 5 is working.
12.1. Create the script. Paste the whole block at once. It’s long, and it ends with the line SCRIPT_END:
# On picam03, as your user
sudo tee /usr/local/sbin/picam-health.sh >/dev/null <<'SCRIPT_END'
#!/bin/bash
# picam-health.sh - daily health report for a Raspberry Pi camera running MediaMTX.
#
# Checks power, temperature, Wi-Fi, MediaMTX, the hardware watchdog, disk space and
# the SD card, then emails a plain-text report with fix instructions for anything wrong.
#
#   sudo picam-health.sh             build the report and email it
#   sudo picam-health.sh --dry-run   build the report and print it instead
#
# Run as root (the systemd timer does): reading the SD card superblock, the kernel
# log and /etc/msmtprc all need it.

MAIL_TO="REPLACE_EMAIL_TO"
DISK_WARN_PCT=80              # flag a filesystem with less than 20% free
WIFI_IF="wlan0"
WIFI_SIGNAL_WARN=-70          # dBm; a weaker (more negative) signal is flagged
TEMP_WARN_C=75                # the Pi starts slowing itself down at 80 C
WRITE_WARN_MB_PER_DAY=1024    # flag more than this much written to the SD card per day
MEDIAMTX_API="http://127.0.0.1:9997"
CAMERA_PATH="cam"
STATE_DIR="/var/lib/picam-health"

DRY_RUN=0
[ "${1:-}" = "--dry-run" ] && DRY_RUN=1

HOST=$(hostname)
WORK=$(mktemp -d)
trap 'rm -rf "$WORK"' EXIT
PROBLEMS="$WORK/problems"
OKS="$WORK/ok"
DETAILS="$WORK/details"
: >"$PROBLEMS"; : >"$OKS"; : >"$DETAILS"
NPROB=0

# problem "<one-line summary>"  (how-to-fix text is read from stdin)
problem() {
    NPROB=$((NPROB + 1))
    {
        echo "PROBLEM $NPROB: $1"
        echo "------------------------------------------------------------"
        cat
        echo
    } >>"$PROBLEMS"
}
ok()     { echo "  [OK] $1" >>"$OKS"; }
detail() { echo "  $1" >>"$DETAILS"; }

########################################################################
# 1. Power supply and temperature
########################################################################
THROTTLED=$(vcgencmd get_throttled 2>/dev/null | cut -d= -f2)
if [ -z "$THROTTLED" ]; then
    problem "Could not read the power status (vcgencmd get_throttled)" <<EOF
The command 'vcgencmd get_throttled' returned nothing. Run it by hand to see the error:
    vcgencmd get_throttled
EOF
elif [ "$THROTTLED" = "0x0" ]; then
    ok "Power: no under-voltage or throttling since boot (throttled=0x0)"
else
    T=$((THROTTLED))
    NOW=""; EVER=""
    [ $((T & 0x1)) -ne 0 ]     && NOW="$NOW under-voltage,"
    [ $((T & 0x2)) -ne 0 ]     && NOW="$NOW CPU-speed-capped,"
    [ $((T & 0x4)) -ne 0 ]     && NOW="$NOW throttled,"
    [ $((T & 0x8)) -ne 0 ]     && NOW="$NOW soft-temperature-limit,"
    [ $((T & 0x10000)) -ne 0 ] && EVER="$EVER under-voltage,"
    [ $((T & 0x20000)) -ne 0 ] && EVER="$EVER CPU-speed-capped,"
    [ $((T & 0x40000)) -ne 0 ] && EVER="$EVER throttled,"
    [ $((T & 0x80000)) -ne 0 ] && EVER="$EVER soft-temperature-limit,"

    if [ $((T & 0x10001)) -ne 0 ]; then
        problem "POWER PROBLEM - the Pi is not getting enough voltage (throttled=$THROTTLED)" <<EOF
Happening right now:${NOW:- nothing}
Has happened since boot:${EVER:- nothing}

Low voltage causes freezes, Wi-Fi dropouts and SD card corruption. It is the most
common reason a Pi camera "just stops working". To fix it, try these in order:
  1. Use a shorter USB cable. Long cables (for example 10 ft / 3 m) drop too much
     voltage. 3 ft / 1 m or shorter is best.
  2. Use a thicker cable. Look for 20 AWG or 22 AWG power wires on the packaging;
     cheap charging cables are often 28 AWG and too thin.
  3. Change the power supply. Use the official Raspberry Pi 5.1 V 2.5 A micro-USB
     supply (it has its own attached cable), not a phone charger.
  4. If the camera has to be far from an outlet, run an extension cord to it and
     keep the USB cable short, rather than using a long USB cable.
The "since boot" flags stay set until the next reboot. After fixing the power,
reboot and check tomorrow's email, or run:  vcgencmd get_throttled
You want to see: throttled=0x0
EOF
    else
        problem "HEAT - the Pi has slowed itself down (throttled=$THROTTLED)" <<EOF
Happening right now:${NOW:- nothing}
Has happened since boot:${EVER:- nothing}

There was no under-voltage, so this is almost certainly heat. A camera in a sunny
window can get very hot. To fix it:
  1. Add a small heatsink to the Pi's processor.
  2. Keep direct sun off the Pi board (shade it, or let the case breathe).
  3. Check the temperature with:  vcgencmd measure_temp
The flags stay set until the next reboot.
EOF
    fi
fi

TEMP=$(vcgencmd measure_temp 2>/dev/null | sed -n "s/^temp=\([0-9]*\).*/\1/p")
if [ -n "$TEMP" ]; then
    if [ "$TEMP" -ge "$TEMP_WARN_C" ]; then
        problem "HEAT - the processor is at ${TEMP} C right now" <<EOF
The Pi slows itself down at 80 C and gets unreliable when it runs this hot for long.
  1. Add a small heatsink to the Pi's processor.
  2. Keep direct sun off the Pi board.
EOF
    else
        ok "Temperature: ${TEMP} C"
    fi
fi

UV_COUNT=$(journalctl _TRANSPORT=kernel --since "24 hours ago" --no-pager -q 2>/dev/null | grep -ci "undervoltage")
if [ "${UV_COUNT:-0}" -gt 0 ]; then
    detail "Kernel logged 'Undervoltage detected' $UV_COUNT time(s) in the last 24 hours."
fi

########################################################################
# 2. Wi-Fi
########################################################################
PS=$(iw dev "$WIFI_IF" get power_save 2>/dev/null)
case "$PS" in
    *off*)
        ok "Wi-Fi power saving: off" ;;
    *on*)
        problem "Wi-Fi power saving is ON" <<'EOF'
With power saving on, the Pi's Wi-Fi goes to sleep and the camera drops off the
network. To turn it off for good:
  1. Create the setting file:
       sudo nano /etc/NetworkManager/conf.d/wifi-powersave-off.conf
  2. Put exactly these two lines in it, then save (Ctrl+O, Enter) and exit (Ctrl+X):
       [connection]
       wifi.powersave = 2
  3. Reboot:
       sudo reboot
  4. After it comes back, check it:
       iw dev wlan0 get power_save
     You want to see:  Power save: off
EOF
        ;;
    *)
        problem "Could not read the Wi-Fi power-save setting" <<EOF
The command 'iw dev $WIFI_IF get power_save' returned nothing. Run it by hand to see
the error, and check that the Wi-Fi interface is really called $WIFI_IF:
    iw dev
EOF
        ;;
esac

LINK=$(iw dev "$WIFI_IF" link 2>/dev/null)
SIGNAL=$(echo "$LINK" | awk '/signal:/ { print $2; exit }')
SSID=$(echo "$LINK" | sed -n 's/^[[:space:]]*SSID: //p')
if [ -z "$SIGNAL" ]; then
    detail "Wi-Fi: could not read the signal strength (not connected?)"
elif [ "$SIGNAL" -lt "$WIFI_SIGNAL_WARN" ]; then
    problem "Weak Wi-Fi signal: $SIGNAL dBm (network: ${SSID:-unknown})" <<EOF
Anything weaker than $WIFI_SIGNAL_WARN dBm is unreliable for video. (Closer to 0 is
stronger: -55 is good, -75 is poor.) Weak signal causes dropped frames and the
"write queue is full" warnings in the MediaMTX log. To improve it:
  1. Move the access point closer, or add one near the camera.
  2. Reduce the bitrate in /usr/local/etc/mediamtx.yml (rpiCameraBitrate).
  3. Metal window frames and low-E window film block Wi-Fi - try another spot.
EOF
else
    ok "Wi-Fi signal: $SIGNAL dBm (network: ${SSID:-unknown})"
fi

WD_EVENTS=$(journalctl -t wifi-watchdog --since "24 hours ago" --no-pager -q -o short 2>/dev/null | grep -E "RECONNECT|REBOOTING")
if [ -n "$WD_EVENTS" ]; then
    problem "The Wi-Fi watchdog had to step in during the last 24 hours" <<EOF
The Pi lost its network connection and the watchdog reconnected or rebooted it:

$WD_EVENTS

An occasional event is fine. If this shows up every day, check the power problem
and Wi-Fi signal sections of this email, and the access point itself.
To see the full watchdog log:
    journalctl -t wifi-watchdog --since "2 days ago"
EOF
else
    ok "Wi-Fi watchdog: no reconnects or reboots in the last 24 hours"
fi
if ! systemctl is-active --quiet wifi-watchdog; then
    problem "The Wi-Fi watchdog service is not running" <<'EOF'
Start it and make it start at boot:
    sudo systemctl enable --now wifi-watchdog
Then check it:
    systemctl status wifi-watchdog
You want to see:  Active: active (running)
EOF
fi

########################################################################
# 3. MediaMTX
########################################################################
if [ "$(systemctl show -p LoadState --value mediamtx)" != "loaded" ]; then
    problem "The mediamtx service does not exist" <<'EOF'
The file /etc/systemd/system/mediamtx.service is missing or broken.
Follow the "Run MediaMTX as a service" part of picam_setup.md again.
EOF
else
    RESTART=$(systemctl show -p Restart --value mediamtx)
    case "$RESTART" in
        always|on-failure|on-abnormal)
            ok "MediaMTX restarts automatically if it crashes (Restart=$RESTART)" ;;
        *)
            problem "MediaMTX will NOT restart by itself if it crashes (Restart=$RESTART)" <<'EOF'
If MediaMTX crashes, the camera stays down until someone reboots the Pi. To fix it:
  1. Open the service file:
       sudo nano /etc/systemd/system/mediamtx.service
  2. In the [Service] section, under the ExecStart= line, add these two lines:
       Restart=always
       RestartSec=5
  3. In the [Unit] section, add this line:
       StartLimitIntervalSec=0
  4. Save (Ctrl+O, Enter) and exit (Ctrl+X), then reload and restart:
       sudo systemctl daemon-reload
       sudo systemctl restart mediamtx
  5. Check it:
       systemctl show -p Restart --value mediamtx
     You want to see:  always
EOF
            ;;
    esac

    if [ "$(systemctl is-enabled mediamtx 2>/dev/null)" != "enabled" ]; then
        problem "MediaMTX is not set to start at boot" <<'EOF'
Fix it with:
    sudo systemctl enable mediamtx
EOF
    fi

    if ! systemctl is-active --quiet mediamtx; then
        problem "MediaMTX is NOT running" <<'EOF'
See why with:
    sudo journalctl -u mediamtx -n 50 --no-pager
Try starting it with:
    sudo systemctl start mediamtx
EOF
    else
        ok "MediaMTX is running"
    fi

    CRASHES=$(journalctl -u mediamtx --since "24 hours ago" --no-pager -q 2>/dev/null | grep -c "Scheduled restart job")
    if [ "${CRASHES:-0}" -gt 0 ]; then
        problem "MediaMTX crashed and was restarted $CRASHES time(s) in the last 24 hours" <<'EOF'
The automatic restart worked, but MediaMTX should not be crashing. See why with:
    sudo journalctl -u mediamtx --since "24 hours ago" --no-pager | grep -iE "ERR|panic|fail"
(If you tested the auto-restart yourself yesterday, that test is counted here.)
EOF
    fi
fi

API_OUT=$(curl -s -m 5 "$MEDIAMTX_API/v3/paths/get/$CAMERA_PATH" 2>/dev/null)
if [ -z "$API_OUT" ]; then
    problem "Could not ask MediaMTX whether the camera is working" <<'EOF'
The MediaMTX API did not answer on 127.0.0.1:9997. Either MediaMTX is not running
(see above), or the API is not turned on. Check /usr/local/etc/mediamtx.yml:
    grep -nE '^(api|apiAddress):' /usr/local/etc/mediamtx.yml
You want to see:
    api: true
    apiAddress: 127.0.0.1:9997
EOF
elif echo "$API_OUT" | grep -q '"ready":true'; then
    READERS=$(echo "$API_OUT" | grep -o '"readers":\[[^]]*\]' | grep -o '"type"' | wc -l)
    ok "Camera stream '$CAMERA_PATH' is live, $READERS viewer(s) connected right now"
else
    problem "The camera is NOT producing video (stream '$CAMERA_PATH' is not ready)" <<'EOF'
MediaMTX is running but the camera is not sending video. Most often this is the
ribbon cable. To check:
  1. See the MediaMTX errors:
       sudo journalctl -u mediamtx -n 50 --no-pager
  2. Stop MediaMTX (it holds the camera) and ask the Pi to list its cameras:
       sudo systemctl stop mediamtx
       rpicam-hello --list-cameras
       sudo systemctl start mediamtx
     You want to see the camera listed (Camera Module 3 shows as "imx708").
  3. If no camera is listed: power off, reseat both ends of the ribbon cable
     (contacts facing the right way), and power on again.
EOF
fi

########################################################################
# 4. Hardware watchdog
########################################################################
WDT=$(systemctl show -p RuntimeWatchdogUSec --value 2>/dev/null)
if [ -z "$WDT" ] || [ "$WDT" = "0" ] || [ "$WDT" = "off" ]; then
    problem "The hardware watchdog is OFF - a frozen Pi will stay frozen" <<'EOF'
With the watchdog on, the Pi reboots itself about 15 seconds after it freezes.
To turn it on:
  1. Create the folder and the setting file:
       sudo mkdir -p /etc/systemd/system.conf.d
       sudo nano /etc/systemd/system.conf.d/watchdog.conf
  2. Put exactly these two lines in it, then save (Ctrl+O, Enter) and exit (Ctrl+X):
       [Manager]
       RuntimeWatchdogSec=15
  3. Reboot:
       sudo reboot
  4. After it comes back, check it:
       systemctl show -p RuntimeWatchdogUSec --value
     You want to see:  15s
EOF
else
    ok "Hardware watchdog: on (reboots the Pi $WDT after a freeze)"
fi

########################################################################
# 5. Disk space
########################################################################
while read -r MNT PCT AVAIL; do
    PCT=${PCT%\%}
    case "$PCT" in ''|*[!0-9]*) continue ;; esac
    FREE=$((100 - PCT))
    if [ "$PCT" -gt "$DISK_WARN_PCT" ]; then
        problem "Low disk space on $MNT: only $FREE% free ($AVAIL left)" <<EOF
Find what is using the space (biggest folders listed last):
    sudo du -xh --max-depth=2 $MNT 2>/dev/null | sort -h | tail -n 15
Common fixes:
    sudo apt clean                       (removes downloaded update files)
    sudo journalctl --vacuum-size=20M    (shrinks the system log)
EOF
    else
        ok "Disk $MNT: $FREE% free ($AVAIL left)"
    fi
done < <(df -h --output=target,pcent,avail -x tmpfs -x devtmpfs -x efivarfs -x squashfs -x overlay 2>/dev/null | tail -n +2)

########################################################################
# 6. SD card health
#    Ordinary SD cards do not report their wear level to Linux, so these are
#    the signs that show up before a card fails completely.
########################################################################
ROOT_DEV=$(findmnt -no SOURCE /)
ROOT_OPTS=$(findmnt -no OPTIONS /)
ROOT_PART=$(basename "$ROOT_DEV")
SD_DISK=$(lsblk -no PKNAME "$ROOT_DEV" 2>/dev/null | head -n 1)
SD_DISK=${SD_DISK:-mmcblk0}

case ",$ROOT_OPTS," in
    *,ro,*)
        problem "CRITICAL: the SD card has been switched to READ-ONLY" <<'EOF'
Linux does this when it finds errors on the card, to protect your data. The card
is probably failing. Plan to replace it:
  1. Buy a new high-endurance card.
  2. Re-image it with Raspberry Pi Imager and follow picam_setup.md again.
Nothing new can be saved until then (including logs and settings).
EOF
        ;;
    *)
        ok "SD card: mounted read-write (normal)" ;;
esac

TUNE=$(tune2fs -l "$ROOT_DEV" 2>/dev/null)
FS_STATE=$(echo "$TUNE" | sed -n 's/^Filesystem state:[[:space:]]*//p')
FS_ERRORS=$(echo "$TUNE" | sed -n 's/^FS Error count:[[:space:]]*//p')
if [ -z "$TUNE" ]; then
    detail "SD card: could not read the filesystem details (tune2fs -l $ROOT_DEV)"
elif echo "$FS_STATE" | grep -qi error || [ "${FS_ERRORS:-0}" -gt 0 ]; then
    FIRST=$(echo "$TUNE" | sed -n 's/^First error time:[[:space:]]*//p')
    LAST=$(echo "$TUNE" | sed -n 's/^Last error time:[[:space:]]*//p')
    problem "Filesystem errors recorded on the SD card (state: $FS_STATE, errors: ${FS_ERRORS:-0})" <<EOF
First error: ${FIRST:-unknown}
Last error:  ${LAST:-unknown}

The filesystem has been damaged at least once, usually by a power problem or a
worn-out card. The Pi checks and repairs a filesystem marked like this when it
boots, so reboot it:
    sudo reboot
Then see whether the errors were cleared:
    sudo tune2fs -l $ROOT_DEV | grep -iE "state|error"
If it still says "with errors", or new errors appear in later emails, replace the
SD card.
EOF
else
    ok "SD card filesystem: $FS_STATE, no errors recorded"
fi

MMC_HOST=$(basename "$(readlink -f "/sys/block/$SD_DISK/device" 2>/dev/null)" 2>/dev/null | cut -d: -f1)
KERR=$(journalctl _TRANSPORT=kernel --since "24 hours ago" --no-pager -q -o short 2>/dev/null \
    | grep -E "${MMC_HOST:-mmc0}: |$SD_DISK|EXT4-fs|I/O error" \
    | grep -Ei "error|timeout|timed out|fail|corrupt|medium" | tail -n 10)
if [ -n "$KERR" ]; then
    problem "The kernel logged SD card or filesystem errors in the last 24 hours" <<EOF
Last 10 matching messages:

$KERR

Occasional errors can come from a power dip (see the power section). Errors every
day mean the SD card is failing - replace it soon.
EOF
else
    ok "SD card: no read/write errors in the kernel log in the last 24 hours"
fi

LIFE_FILE="/sys/fs/ext4/$ROOT_PART/lifetime_write_kbytes"
if [ -r "$LIFE_FILE" ]; then
    LIFE_KB=$(cat "$LIFE_FILE")
    NOW_S=$(date +%s)
    mkdir -p "$STATE_DIR"
    if [ -r "$STATE_DIR/last-write" ]; then
        read -r PREV_KB PREV_S <"$STATE_DIR/last-write"
        HOURS=$(( (NOW_S - PREV_S) / 3600 ))
        if [ "$HOURS" -ge 1 ] && [ "$LIFE_KB" -ge "$PREV_KB" ]; then
            MB_PER_DAY=$(( (LIFE_KB - PREV_KB) * 24 / HOURS / 1024 ))
            if [ "$MB_PER_DAY" -gt "$WRITE_WARN_MB_PER_DAY" ]; then
                problem "Heavy writing to the SD card: about $MB_PER_DAY MB per day" <<'EOF'
This wears the card out faster. Something is writing much more than normal - often a
program logging too much. Find the busiest logs with:
    sudo journalctl --since "24 hours ago" --no-pager -o cat | sort | uniq -c | sort -n | tail -n 20
Then re-check the "Reduce writes to the SD card" part of picam_setup.md.
EOF
            else
                ok "SD card writes: about $MB_PER_DAY MB per day"
            fi
        fi
    fi
    echo "$LIFE_KB $NOW_S" >"$STATE_DIR/last-write"
    detail "SD card: $((LIFE_KB / 1024 / 1024)) GB written since the card was imaged."
fi

CARD_NAME=$(cat "/sys/block/$SD_DISK/device/name" 2>/dev/null)
CARD_DATE=$(cat "/sys/block/$SD_DISK/device/date" 2>/dev/null)
CARD_SIZE=$(lsblk -dno SIZE "/dev/$SD_DISK" 2>/dev/null | tr -d ' ')
[ -n "$CARD_NAME" ] && detail "SD card: model $CARD_NAME, $CARD_SIZE, made $CARD_DATE."

########################################################################
# 7. General information
########################################################################
detail "Up since: $(uptime -s) ($(uptime -p))"
detail "IP address: $(hostname -I 2>/dev/null)"
detail "OS: $(. /etc/os-release && echo "$PRETTY_NAME"), kernel $(uname -r)"
MTX_VER=$(/usr/local/bin/mediamtx --version 2>/dev/null)
detail "MediaMTX version: ${MTX_VER:-unknown}"

########################################################################
# Build and send the report
########################################################################
if [ "$NPROB" -eq 0 ]; then
    SUBJECT="[$HOST] Daily health: OK"
else
    SUBJECT="[$HOST] Daily health: $NPROB PROBLEM(S) FOUND"
fi

REPORT="$WORK/report"
{
    echo "To: $MAIL_TO"
    echo "Subject: $SUBJECT"
    echo "Content-Type: text/plain; charset=UTF-8"
    echo
    echo "Daily health report for $HOST - $(date '+%A %Y-%m-%d %H:%M %Z')"
    echo
    if [ "$NPROB" -eq 0 ]; then
        echo "Everything looks good. No action needed."
    else
        echo "$NPROB problem(s) need attention. Each one has instructions below."
        echo
        cat "$PROBLEMS"
    fi
    echo
    echo "PASSED CHECKS"
    echo "------------------------------------------------------------"
    cat "$OKS"
    echo
    echo "DETAILS"
    echo "------------------------------------------------------------"
    cat "$DETAILS"
    echo
    echo "-- Sent by /usr/local/sbin/picam-health.sh on $HOST"
} >"$REPORT"

if [ "$DRY_RUN" -eq 1 ]; then
    cat "$REPORT"
else
    msmtp "$MAIL_TO" <"$REPORT"
fi
SCRIPT_END
sudo chmod 755 /usr/local/sbin/picam-health.sh
sha256sum /usr/local/sbin/picam-health.sh
Expected result:
b4952973e489634bd0e8744d31297b8e1adb2d453be117707f6c4323167db03d /usr/local/sbin/picam-health.sh
If the checksum is different, something was lost or changed while pasting. Run step 12.1 again.
12.2. Set the address the report goes to. Open the script:
# On picam03, as your user
sudo nano /usr/local/sbin/picam-health.sh
Near the top (line 13), change MAIL_TO="REPLACE_EMAIL_TO" to your address, for example MAIL_TO="you@example.com". Save (Ctrl+O, Enter) and exit (Ctrl+X). Then check it:
# On picam03, as your user
grep -n '^MAIL_TO=' /usr/local/sbin/picam-health.sh
Expected result: 13:MAIL_TO="<your address>"
12.3. Run the report without sending it, and read through it:
# On picam03, as your user
sudo /usr/local/sbin/picam-health.sh --dry-run
Expected result: a report starting with To: and Subject:. If you’ve done every part above, the subject shows OK, or just 1 PROBLEM(S) FOUND for the crash you caused on purpose in step 8.3. The PASSED CHECKS section lists everything else, and the camera line shows how many viewers are connected. (The “SD card writes per day” line only appears from the second run on, because it needs the previous day’s number to compare against.) Fix anything else it reports before going on.
12.4. Send one real report now to make sure it arrives:
# On picam03, as your user
sudo /usr/local/sbin/picam-health.sh
Expected result: no output, and the email arrives. Tip: in Gmail, create a filter on the subject [picam03] so the daily reports go to their own label.
12.5. Schedule it for 7:00 AM every day:
# On picam03, as your user
sudo tee /etc/systemd/system/picam-health.service >/dev/null <<'EOF'
[Unit]
Description=Send the daily picam health report
Wants=network-online.target
After=network-online.target

[Service]
Type=oneshot
ExecStart=/usr/local/sbin/picam-health.sh
EOF
sudo tee /etc/systemd/system/picam-health.timer >/dev/null <<'EOF'
[Unit]
Description=Daily picam health report at 7:00 AM

[Timer]
OnCalendar=*-*-* 07:00:00
Persistent=true

[Install]
WantedBy=timers.target
EOF
sudo systemctl daemon-reload
sudo systemctl enable --now picam-health.timer
systemctl list-timers picam-health.timer --no-pager
Expected result: one timer listed, with NEXT showing 7:00 AM tomorrow (or today, if it’s still before 7:00) in your time zone. If the time zone is wrong, fix it with sudo raspi-config → Localisation Options → Timezone. (Persistent=true means that if the Pi was off at 7:00, the report is sent as soon as it’s back on.)
If the daily email stops arriving, treat that as a problem too. It usually means the Pi is off, off the network, or its SD card has failed.
Part 13 – Final check
13.1. Reboot one last time, to prove everything comes back by itself:
# On picam03, as your user
sudo reboot
13.2. Wait 2–3 minutes, then:
- VLC plays
rtsp://<picam03-ip>:8554/cam. - Log in and run
sudo /usr/local/sbin/picam-health.sh --dry-run. The only problem it should report is the step 8.3 test crash, if that happened in the last 24 hours.
13.3. Back up the finished card. Once everything works, shut down (sudo poweroff), put the SD card in your PC, and use Win32 Disk Imager’s Read button to save an image of it. If the card ever dies, you can write that image to a new card and be back up in minutes, instead of following this guide again.
13.4. Point your NVR (Frigate, Blue Iris, etc.) at rtsp://<picam03-ip>:8554/cam. If the NVR has an RTSP transport option, set it to TCP.
Checklist
grep VERSION_CODENAME /etc/os-releaseshowstrixie, anduname -mshowsaarch64- DHCP reservation created for
picam03 rpicam-hello --list-cameraslistsimx708vcgencmd get_throttledshowsthrottled=0x0with the camera mounted and streamingiw dev wlan0 get power_saveshowsPower save: off- Wi-Fi signal is -70 dBm or better
swapon --showlists only/dev/zram0, and/var/swapis gone- Journal capped at 50 MB; apt/man-db timers disabled
mediamtx --versionshowsv1.21.1, and--validate-confsays the file is valid- The stream plays in VLC
mediamtxservice enabled and running; the SIGKILL test restarted itsystemctl show -p RuntimeWatchdogUSec --valueshows15swifi-watchdogchecksum matches, both dry-run tests behave as shown, and the service is running- Test email received through msmtp
picam-health.shchecksum matches, the dry run looks right, the real email arrived, and the timer is scheduled for 7:00 AM- After the final reboot, everything comes back without help
- SD card image backed up
Maintenance
About once a month, install updates, since automatic updates are turned off in Part 5:
# On picam03, as your user
sudo apt update
sudo apt full-upgrade -y
sudo reboot
After it comes back, check that the stream still plays in VLC.
To update MediaMTX later (replace 1.21.1 with the new version number everywhere below, and read that release’s notes on GitHub for anything that changed):
# On picam03, as your user
cd ~
wget https://github.com/bluenviron/mediamtx/releases/download/v1.21.1/mediamtx_v1.21.1_linux_arm64.tar.gz
wget -O checksums.sha256 https://github.com/bluenviron/mediamtx/releases/download/v1.21.1/checksums.sha256
sha256sum --check --ignore-missing checksums.sha256
Only if that says OK:
# On picam03, as your user
rm -rf ~/mediamtx-new && mkdir ~/mediamtx-new
tar -xzf mediamtx_v1.21.1_linux_arm64.tar.gz -C ~/mediamtx-new
~/mediamtx-new/mediamtx --validate-conf=/usr/local/etc/mediamtx.yml
Only if that says configuration file is valid (this keeps your existing settings file):
# On picam03, as your user
sudo systemctl stop mediamtx
sudo install -m 755 ~/mediamtx-new/mediamtx /usr/local/bin/mediamtx
sudo systemctl start mediamtx
/usr/local/bin/mediamtx --version
systemctl status mediamtx --no-pager
Troubleshooting
If the camera goes down again, collect this before you wipe the card. The logs are kept across reboots (Part 5.2), so the evidence is still there after a restart:
# On picam03, as your user
journalctl --list-boots --no-pager | tail -n 5
sudo journalctl -b -1 -p warning --no-pager | tail -n 50
sudo journalctl -b -1 -n 30 --no-pager
vcgencmd get_throttled
sudo /usr/local/sbin/picam-health.sh --dry-run
-b -1 means “the previous boot”. The last lines before a sudden stop often show the cause, such as under-voltage, SD card errors, or Wi-Fi dropping. If the last lines are ordinary messages with no clean shutdown after them, the Pi lost power or froze.
No video / the health email says the camera isn’t producing video: check sudo journalctl -u mediamtx -n 50 --no-pager. Then run sudo systemctl stop mediamtx followed by rpicam-hello --list-cameras. If no camera is listed, power off and reseat the ribbon cable. Start MediaMTX again with sudo systemctl start mediamtx.
Image keeps drifting in and out of focus (often at night, through glass): Camera Module 3 autofocuses constantly by default. Lock the focus instead by adding these two lines under cam: in /usr/local/etc/mediamtx.yml, indented the same as the other rpiCamera... lines:
    rpiCameraAfMode: manual
    rpiCameraLensPosition: 0.0
0.0 focuses at infinity. 0.5 focuses at 2 m, and 1.0 at 1 m (the value is 1 divided by the distance in metres). Then run /usr/local/bin/mediamtx --validate-conf=/usr/local/etc/mediamtx.yml and sudo systemctl restart mediamtx.
write queue is full warnings, or choppy video: the Wi-Fi can’t keep up. Improve the signal, or lower rpiCameraBitrate (for example to 1000000) and restart MediaMTX.
The Pi keeps rebooting: run journalctl -t wifi-watchdog --since "2 days ago" --no-pager to see whether the Wi-Fi watchdog is doing it, and why. If the router is being replaced or will be down for a long time, pause the watchdog with sudo systemctl stop wifi-watchdog, and start it again afterwards with sudo systemctl start wifi-watchdog.
No daily email: run systemctl list-timers picam-health.timer --no-pager to confirm it’s scheduled, sudo journalctl -u picam-health -n 30 --no-pager to see the last run, and sudo journalctl -t msmtp -n 5 --no-pager to see whether sending failed.
References
I want to call out a few resources that helped me get this set up.
- Čečavac, Dragan. “Building Your Own WIFI Camera with Raspberry Pi Zero W.” Medium, Medium, 8 Oct. 2023, medium.com/@celecavac/building-your-own-wifi-camera-with-raspberry-pi-zero-w-6d59b494e0c9.
- MediaMTX releases: https://github.com/bluenviron/mediamtx/releases
- MediaMTX v1.21.1 release (version used in this guide): https://github.com/bluenviron/mediamtx/releases/tag/v1.21.1
- MediaMTX v1.21.1 default configuration file: https://github.com/bluenviron/mediamtx/blob/v1.21.1/mediamtx.yml
- MediaMTX – Raspberry Pi Cameras: https://mediamtx.org/docs/publish/raspberry-pi-cameras
- MediaMTX – Start on boot: https://mediamtx.org/docs/usage/start-on-boot
- Raspberry Pi – Trixie, the new version of Raspberry Pi OS: https://www.raspberrypi.com/news/trixie-the-new-version-of-raspberry-pi-os/
- Raspberry Pi – Cloud-init on Raspberry Pi OS: https://www.raspberrypi.com/news/cloud-init-on-raspberry-pi-os/
- Raspberry Pi Forums – rpi-swap (Trixie only), zram-based swap: https://forums.raspberrypi.com/viewtopic.php?t=390708
- The Homelab Postmortem – Your Pi’s 2 GB swap file isn’t swap (rpi-swap zram-only setting used in Part 5.1): https://homelabpostmortem.com/2026/08/19/trixie-rpi-swap-writeback-file/
- Debian 13 “Trixie” release notes – issues to be aware of (/tmp is now in RAM): https://www.debian.org/releases/stable/release-notes/issues.html
- msmtp documentation: https://marlam.de/msmtp/documentation/
Final Thoughts
I was able to get things working but I have seen the Raspberry Pi not able to serve up the stream occasionally but it is starting to look like it may be usable. I’m going to make a case for this so that it can mount on a window where I have the ESP32-CAM cameras mounted. If they run well for a month or so, I may replace the three ESP32-CAM cameras that I have. I’m thinking about adding the ability to move the camera’s as well using some servo motors. I will have to determine what would be required to do that with Blue Iris and the Raspberry Pi GPIO pins.

