
I wanted to look at replacing some ESP32-CAM cameras that I have in my windows with some Raspberry Pi Cameras. My hope is that I can get better quality and potentially have some usable video at night. I looked at several options but none seem to be satisfactory but the most promising was the open source project, MediaMTX. It was simple to get setup as it just worked. The issue that I have is even tweaking it to only serve on RTSP stream at 640×480, it could still not deliver a continous smooth stream. I constantly received “write queue is full” warnings. I did serveral things in an attempt to allow it to run smoother, but nothing seemed to help. To be fair, I did start with a Raspberry Pi Zero 2 W, which may be underpowered for this task.
Parts Used in this Project
Here are some links to the items that I used in this project.
The Amazon links are affiliate links that will provide me some income to offset the cost of this site and allow me to continue posting similar content. I have also provided links to PiShop.us in case items are out of stock at Amazon.
- Raspberry Pi Zero 2 W
- Amazon: https://amzn.to/3Bo6dSi
- PiShop.us: https://www.pishop.us/product/raspberry-pi-zero-2-w/
- Raspberry Pi Camera Module 3
- Raspberry Pi Zero Mini Camera Cable – 38mm
- Raspberry Pi Power Supply
- Suction Cups 40mm Glass Suction (for window mounting)
- Amazon: https://amzn.to/3ZXBPYq
Steps to setup the software
- Write the latest Raspbian image to an SD Card using Raspberry Pi Imager.
- Click the “Choose Device” button and select “Raspberry Pi Zero 2 W” from the list.

- Click the “Choose OS” button and select “Raspberry Pi OS (other)”, then “Raspberry Pi OS Lite (64-bit)”.


- Click the “Choose Storage” button and select the SD Card from the list.

- Click the “Next” button and follow the prompts. Once the card is validated and you receive a confirmation message that the image has been written to the SD Card, remove the card from the computer and move it to the Raspberry Pi Zero 2 W board and power it on.

- Click the “Choose Device” button and select “Raspberry Pi Zero 2 W” from the list.
- Once the Raspberry Pi boots up, and finishes setting up, log into the Raspberry Pi. You may do this directly with an attached keyboard and monitor or by connecting with SSH.
- Update the Raspberry Pi OS by running the following code.
sudo apt update -y && sudo apt upgrade -y - Download MediaMTX for the Raspberry Pi Zero 2 W by running the following command.
wget https://github.com/bluenviron/mediamtx/releases/download/v1.10.0/mediamtx_v1.10.0_linux_arm64v8.tar.gz - Make a new directory for the MediaMTX application by running the following command.
mkdir mediamtx - Unpack the MediaMTX application release into the application folder with the following command.
tar -C mediamtx -xvzf mediamtx_v1.10.0_linux_arm64v8.tar.gz - Change to the application directory.
cd mediamtx - Edit the YAML file.
nano mediamtx.yml - It is recommended to make the following changes to the file as well.
- Find “protocols: [udp, multicast, tcp]” and change to “protocols: [tcp]”
(~Line 230) - Find “rtmp: yes” and change yes to no
(~Line 263) - Find “hls: yes” and change yes to no
(~Line 283) - Find “srt: yes” and change yes to no
(~Line 395)
- Find “protocols: [udp, multicast, tcp]” and change to “protocols: [tcp]”
- Add these lines at the end of the YAML file to provide a stream for the Raspberry Pi Camera.
(~Line 698)paths:
# example:
# my_camera:
# source: rtsp://my_camera
# Settings under path "all_others" are applied to all paths that
# do not match another entry.
cam:
source: rpiCamera
rpiCameraWidth: 1280
rpiCameraHeight: 720
rpiCameraFPS: 15
rpiCameraBitrate: 1500000
all_others: - Save the file and exit the Nano editor.
- Run MediaMTX by typing the following command.
./mediamtx- You should not see any errors.
- Any Warnings may be ignored. Common Warning messages are the following.
- WARN RPiSdn sdn.cpp:40 Using legacy SDN tuning – please consider moving SDN inside rpi.denoise
- WAR [RTSP] [session 861b8faa] write queue is full
- Note once you connect to the stream from VLC, Blue Iris, or other viewer, you should see a line similar to the following at the end of the output.
2024/12/15 19:17:39 INF [RTSP] [session 861b8faa] is reading from path ‘cam’, with TCP, 1 track (H264)
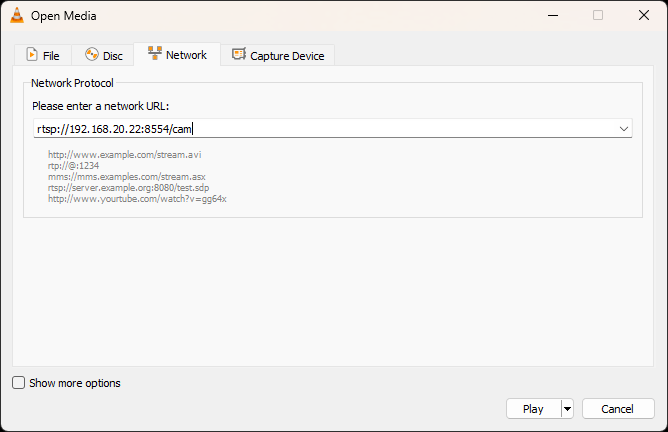
- You may validate that the stream is working properly by opening VLC going to the “file “Media” menu and selecting “Open Network Stream…”
NOTE: I’m running VLC on Windows
- In the “Please enter a network URL:” textbox, enter the following and press the “Play” button.
rtsp://<Raspberry Pi Address>:8554/cam
- If everything is working, you should see the video from the camera.

- Once it is verified that everything is working properly, exit mediamtx by pressing the <Ctrl> and C keys on the keyboard.
- Now we want MediaMTX to start up when the Raspberry Pi reboots. To run MediaMTX on startup, a service file needs to be created. Run the following command to create and edit the service file.
sudo nano /etc/systemd/system/mediamtx.service - Add the following content to the file.
[Unit]
Description=MediaMTX service
Wants=network.target

[Service]
ExecStart=/home/pi/mediamtx/mediamtx /home/pi/mediamtx/mediamtx.yml

[Install]
WantedBy=multi-user.target
- Save and close the file.
- To enable the service, the following two commands need to be run.
sudo systemctl daemon-reload
sudo systemctl enable mediamtx.service - The following set of commands are useful for viewing the status, restarting, starting, and stopping the service.
Yes, I know services are called daemons on Linux.- sudo systemctl status mediamtx
- sudo systemctl restart mediamtx
- sudo systemctl start mediamtx
- sudo systemctl stop mediamtx


Connecting to the camera from Blue Iris
When adding a the camera to Blue Iris, the settings need to be entered properly. Below is a screenshot and the list of settings.

- Select “rtsp://” from the protocol dropdown list.
- Enter the following for the URL.
<IP Address>:8554/cam - Clear the “User” and “Password” textboxes.
- Set the “Media/video/RTSP port” to 8554.
- Leave the “Discovery/ONVIF port” to the default setting.
- Keep the other options to the default values
After clicking the “OK” button, the video stream should be displayed in Blue Iris.

References
I want to call a few resources that helped me get this setup.
- Čečavac, Dragan. “Building Your Own WIFI Camera with Raspberry Pi Zero W.” Medium, Medium, 8 Oct. 2023, medium.com/@celecavac/building-your-own-wifi-camera-with-raspberry-pi-zero-w-6d59b494e0c9.
Final Thoughts
I was able to get things working but I have seen the Raspberry Pi not able to serve up the stream occasionally but it is starting to look like it may be usable. I’m going to make a case for this so that it can mount on a window where I have the ESP32-CAM cameras mounted. If they run well for a month or so, I may replace the three ESP32-CAM cameras that I have. I’m thinking about adding the ability to move the camera’s as well using some servo motors. I will have to determine what would be required to do that with Blue Iris and the Raspberry Pi GPIO pins.